Acer File Extensions |
Primax Colorado D600 Scanner Guide
Windows XP/Vista Compatibility
Regarding compatibility with newer versions of Windows, Primax have released the following statement.
"Primax is not producing any driver files for the new Microsoft Windows operating systems. Please install the Windows 98 Driver for Windows ME and the Windows 2000 Driver for Windows XP. Primax's Technical Support department can't guarantee the function of any Primax Products on Microsoft Windows ME or Microsoft Windows XP".
Since releasing the above statement Primax have closed their website so I think we can safely say there is no support for Windows XP or Windows Vista.
D600 Scanner Guide
| Installation |
| How to Scan |
| Taskbridge Basics |
| Scanning From Other Programs |
| Scanner Settings |
| Troubleshooting |
Installation
The following should be supplied in the box,
- Power Adapter
- Scanner
- Scanner Software CD
- Scanner Cable
The system requirements for the scanner are as follows,
- 486, Pentium or higher, IBM-compatible
- 16 MB RAM, 32 MB or more recommended
- At least 80 MB hard disk space for software installation and some working space
- Printer (parallel) port
- CD-ROM drive
- Windows 3.1 or Windows 95
To connect the scanner,
- Start with your computer, monitor, and any other peripherals turned off.
- Plug the power adapter into the scanner’s power receptor
- Plug the scanner cable into the scanner port labeled Host .
- Plug the scanner cable into your PC’s printer port.
- Plug the power adapter into an electrical outlet.
- Connect your printer cable to the scanner port labeled Printer.
- Switch your computer back on.
To install the scanner software,
Under Windows 95
- Insert the CD into your drive.
- The Setup Wizard pops up automatically with a few choices for you to make. Make your choices and follow the instructions.
- 3. The last screen in the setup wizard asks you to restart Windows. After this, you're ready to scan!
- Note: If for any reason, the Setup doesn't run automatically, please use the Start menu Run command to launch the Setup.exe file on the CD-ROM.
Under Windows 3.1
- Insert the CD into your drive.
- Choose Run from the File menu in Program Manager.
- Type your CD-ROM drive letter followed by :\Setup.exe. Click OK.
- The Setup Wizard pops up automatically with a few choices for you to make. Make your choices and follow the instructions.
- The last screen in the setup wizard asks you to restart Windows. After this, you're ready to scan!
To test the installation, press the scanner's start button (the green button at the front of the scanner on the right). If the software installation has been successful, and the scanner is connected correctly, you will see a program window (TaskBridge) appears on your PC's screen. If you try the above and it doesn't seem to work, please check out the Troubleshooting section at the end of this page.
How to Scan
Pick a photo or document, place it face down on the scanner glass and press the Start button. It’s that easy! This activates the TaskBridge program on your PC. You can then send the scan to your photo editing software, word processor or a printer.
This section shows you how to scan a photo and describes more about the TaskBridge program. The focus is on using the scanner in the most direct and easy way possible.
Scanning a photo
- Put your photo or document face down onto the scanner glass and close the cover.
- Press the scanner’s start button. TaskBridge appears on your screen.
- Press preview to see what the scan will look like.
- Move your cursor to the top left of the photo or document. Click and drag down to the bottom right of the area to scan.
- Click on the Photo button. TaskBridge scans and then sends the image to your program.
- Image appears in photo editing software.
In the photo editing software, you can edit and enhance photos, incorporate them into cards, calendars or other photos, or save them to disk for later use. To have more fun with your photos, check out the software documentation.
Regardless what you're scanning, the basic process is the same.
Taskbridge Basics
TaskBridge is the expressway on which your scanned images and documents get to where you want them to go. While using TaskBridge, remember that on-line help is just a mouse-click away. To access help, press the right mouse button on any button of the application tray. Choose On-line help, TaskBridge pops up the Help window. Move the cursor to the graphic or text you want to know about and, when the cursor changes to a hand shape, click for more information. To close the help window, choose Exit from the File menu, or click on the window’s top right button.
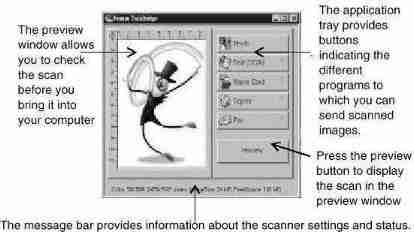
There are three main areas in the TaskBridge window:
The Preview window. After pressing the preview button, the preview window displays the photo or document on the scanner glass. This window allows you to select the area you wish to scan. By dragging your mouse across an area, you create a crop box that contains your scan area. You can adjust the size of this box by dragging its handles, or its position by clicking on it and dragging. At the top left of the window, there is a ruler type button, clicking on this allows you to select the ruler units from inches or centimetres.
The message bar, below the preview window, gives you a quick look at the settings that the image will be scanned at, the scan mode and resolution you choose, the image pixel size, the predicted size of your scan after saving to disk, and the amount of free space on your hard disk. The predicted size changes if you change the scan area size, the scan mode and/or the resolution. If the image size exceeds the amount of free space, you will not be able to complete the scan. In this case, you can reduce the scan mode, resolution, scan area, or clear some space on your hard disk. When you move the cursor onto a button in the application tray, the scan settings for that button appear in the message box. To change the settings, with your mouse still on the button, click the right mouse button and choose Existing Setting from the pop-up menu that appears.
The Application tray. Each button in this tray represents a document type and a destination. As standard the following options are available,
- Scanning text
- Making a copy
- Scanning a photo
- Scanning a Name Card
- Sending a fax
To select one, move your cursor to the button, a "green light" appears, then click. (If you don't have applications linked to the button, the button is greyed-out and the green light will not appear). For each button, settings can be accessed through the right mouse button. The settings include scan mode, resolution, brightness, contrast, gamma, size, and, if available, a choice of destination programs. For further information about the individual settings, go to the Scanner Settings section.
Destination programs are detected each time you run TaskBridge (a list of supported programs is included in the Troubleshooting section).
TWAIN Basics
If you want to scan from any image editing, OCR, or other program that can accept scans, you can do so via a standard link called TWAIN. Any program that supports TWAIN can access the scanner and make full use of its functions.This chapter describes the TWAIN interface in detail and explains all the scanning settings.
After installing the scanner and associated software, you should be able to find the scanner commands, as follows:
- From within the Twain-compliant application, choose Select Source in the File menu and the Select Source dialog appears. In this dialog box, you should see "Primax Colorado D600". Choose this and click Select. The dialog box closes.
- Choose Acquire in the File menu, and the TWAIN window opens:
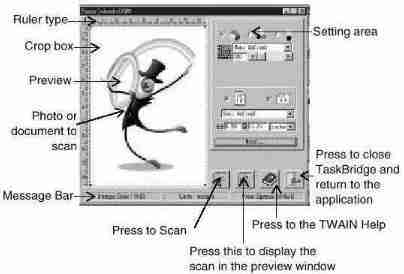
Regardless of what you want to scan, once the TWAIN window is open, the process is the same:
If you are scanning multiple photos or documents, you can continue to scan and transfer until you're finished. When you want to return to the TWAIN-compliant application, press the Close button.
- Put your photo or document face down onto the scanner glass and close the cover.
- Press preview to see what the scan will look like.
- Move your cursor to the top left of the photo or document. Click and drag down to the bottom right of the area to scan.
- Select the settings you want to use. For more information, see scanning settings.
- Click on the Scan Button.
The image appears in any TWAIN-compliant application after scanning.
Scanner Settings
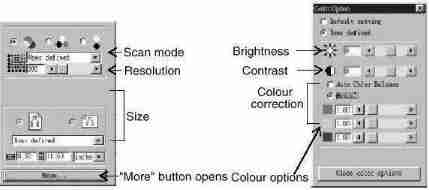
Scan Mode
The scan mode determines the amount of colour information collected from your original. Choose this option based on what the original is - colour or black & white - and what you want to use the scan for: colour display, black & white printing, OCR,... Your choice also influences the file size: true-colour being the largest, greyscale the next and black & white the smallest. When you change this option, look at the projected file size in the message bar: true-colour images are three times larger than grayscale and twenty-four times larger than black & white!
- True-colour. This scan mode collects the maximum amount of colour information from the original, up to around 16.7 million colours! Choose this option for a colour original that you want to display, print or edit in colour.
- Greyscale. Use this mode for black & white photos or scanning colour material that you plan to print on a black & white printer.
- Line-art. If you are scanning text or a line drawing - a picture that only contains black lines and no colours or shades of grey - choose this mode.
Resolution
Resolution determines the amount of detail collected from an original. The higher the resolution, the more detail. Select a value based on what you want to use the scan for. In general, we recommend you keep the resolution as low as possible because the higher the resolution, the slower your scan and the larger the resulting file size. A lower resolution (100-200dpi) can capture more colour and detail information than most printers and displays can show. When you adjust the resolution, keep an eye on the projected file size in the message bar. Try the following:
- 100dpi. For images that you want to display on screen at about the same size as the original in a presentation or on your web page. Also use this for larger images that you will reduce in size to include in a report or presentation and print out on a normal colour or black & white printer (with a print resolution of 300~360dpi).
- 200dpi. For small images to display at a larger size on screen, or for any size image to print out at original size on a colour or black & white printer (up to 720dpi print resolution). Also use 200dpi (with black & white scan mode) to OCR clear text (over 10pt): for small text, use 300dpi.
- 300dpi. When quality is critical and you have already found that a lower resolution is inadequate choose 300dpi for any size image, for any use (to determine if the resolution is too low, look for squares in the image, see below). Also use 300dpi (with black & white scan mode) for the best OCR result.
- Over 300dpi. Unless you have a specific reason for selecting a higher resolution, we suggest you do not because the resulting file size maybe very large and take up a lot of your hard disk space, for example a 3" x 5" photograph scanned at 2400dpi, true-colour will be over 240MB.
Size
You can adjust scan size in the preview window, enter a width and length in the size entry boxes or select a fixed size from the list box. You can move the crop box by dragging. The orientation option swaps the width and height values.
Brightness, contrast & gamma
Also known as tone correction commands, these settings adjust images as they are scanned. For example, you may have a photo that is over-exposed (too light) and so you decrease the brightness or gamma to darken the photo. The contrast makes the difference between dark and light areas more or less obvious. Increasing it increases the difference, while decreasing it reduces the difference. Try small changes at first and view the effect. Experimentation is the only route to good results. However, for most photos and documents, you will not need to adjust these values.
If you have particularly dark photos (that are correctly exposed) try increasing the gamma a little (maybe up to 1.4) to bring out details in the shadow areas without affecting the overall tonal range in the image.
For very light photos, for example from a skiing trip in bright sunlight, reduce the gamma (maybe down to 0.8) to bring out details in the bright areas. This again does not affect the overall tonal range in the image.
If you use brightness or contrast in the above two cases, you actually reduce the amount of information collected from the original, but gamma collects more information in dark or light areas and less in the opposite type of area.
If your OCR result is not as good as usual and it maybe because the original is unclear, adjust the brightness. For bolder text try -10, for lighter, try +10. With this you can increase the contrast a little for bolder text or decrease the contrast for lighter.
If parts of lines fade out after scanning, you can reduce the brightness and/or decrease the contrast in much the same way as for scanning text. Similarly if you find that scanned lines appear bolder (fatter), reduce the brightness and/or increase the contrast.
Troubleshooting
This section provides information on maintaining the scanner and answers questions to help you solve problems you might encounter when using the scanner.
Scanner does not respond.
- Make sure all connections are secure and correct.
- Reset the computer and try again.
- Reinstall the software, reset your computer and then try again.
- Check the Parallel Port Mode of your computer is EPP or SPP (EPP is faster).
Setup wizard doesn't auto start.
- Check your computer system, auto start is only available under Windows 95.
- Under Windows 95, please check if your CD-ROM is set to Auto Insert Notification. Go into the Control Panel, System, and Device Manager and check in the properties for your CD-ROM.
After restarting the computer can't find program icons.
- If program icons do not appear in the Start menu under Programs, try reinstalling.
Setup wizard crash during installation.
- Reinstall the software.
- The Primax software will not install if the PC is set to 640x480 16 colours.
- If you are running MS Office 97, you may need to close that down before installing the software.
The scanner's scanning lamp does not light up.
- Make sure the TWAIN window appears on screen. If not, select the source and acquire for the TWAIN window.
- Make sure all connections are secure and correct.
Scanner scans very slowly
- Make sure the resolution of the scanner is not set too high (preferably 300dpi or lower).
- Check your connections.
Error: "Printer port is busy now. Please scan later!"
- Appears if you are trying to print and scan at the same time. Please be sure that your printer has finished printing before you start to scan and vice versa.
Error: "Scanner not found. Please check the following: (1) LPT port (SPP/EPP) is enabled. (2) Power adapter is plugged into the scanner connector. (3) Parallel port cable is plugged into the LPT port."
This is displayed if there is a problem communicating with the scanner, maybe caused by no power, no connection or an installation problem. Please check your connections and check that your wall socket and power switches are all turned on.
TaskBridge doesn't show destination software.
Make sure the software is supported by TaskBridge. TaskBridge supports: MGI Photo Suite, MS Paint, Adobe PhotoShop, ReadIRIS OCR, MS Word for Windows, WordPerfect, Word Pro, WordPad, NotePad, MS Write, CardIRIS, MS Fax, and WinFax.
Error: "Application link error. Please check the destination program is correctly installed or select a new destination. [Path name of destination program displayed]"
Displayed when you press a destination button in TaskBridge and the selected destination cannot be located. Click OK to return to TaskBridge and select a new destination from the pop-up menu that appears. If this problem persists, reinstall TaskBridge.
Error: "Cannot create temporary file.
Appears if TaskBridge cannot create a temporary file. Click OK to return to TaskBridge and then check that there is space available on your hard disk and that your selected resolution is not too high (it is best at 300dpi or less), this normally occurs when a hard disk is full or the image you are scanning is very large. You can clear disk space by deleting files from TEMP directories or by deleting old files you no longer need.
Error: "Character recognition failed. Check you are using black & white, 300dpi settings and the OCR program is correctly installed".
Appears if TaskBridge detects an error during or after the transfer of image data to the OCR engine and then onto the word processor. Check that your OCR program is correctly installed and then reinstall TaskBridge. If the destination is then not available check problem 4A above.
Error: "Disk space is not enough. Please try again with a lower resolution or smaller scan size".
Displayed if the image you are scanning occupies all available disk space. Click Cancel to return to TaskBridge and adjust your settings to a lower resolution and/or smaller scan size. You can also clear disk space by deleting files from TEMP directories or by deleting old files you no longer need.
Error: "Your available hard disk space is very limited. Please enter the other temporary file paths and click OK to continue, or Cancel and then reduce the size of your scan and try again."
Appears if your available hard disk space is less than the predicted scan size or almost the same. If you have additional space on other drives, enter the drive letter and a directory name to use for additional temporary file storage. We recommend you click Cancel and change your settings to a lower resolution or a smaller scan size. You can also clear disk space by deleting files from TEMP directories or by deleting old files you no longer need.
The TWAIN window does not appear after choosing Acquire.
- Make sure all connections are secure and correct.
- Check that the scanner is selected in the Select Source dialog box.
- Reinstall the software.
- Check your connections.
Unable to scan to application software.
- Check that the scanner is selected in the Select Source dialog box.
- Make sure all connections are secure and correct.
- Shut down all open programs and Windows, restart your computer and try again.
Appear error message "Disk space is not enough".
Scan again with a lower resolution setting.
The scanned image is too light or too dark.
- Check if the Scan Window is clean.
- Adjust the brightness or colour gamma settings and try again.
Moiré patterns appear on the scanned image.
The original image is commercially printed. Try reducing the resolution by a small amount, for example from 200dpi to 190dpi; keep reducing until the patterns disappear.
Transitions in colour are very abrupt (after scanning with true colour scan mode).
This is normal if you are using a display mode that can only display 256 or 16 colours at a time. Try using a high- or true-colour mode instead. Refer to the Windows Manual and your display card’s guide for more information.
Unable to print to printer.
- Make sure all connections are secure and correct.
- Check your printer is turned on and full of paper.
- Check your parallel port mode is supported by both your printer and the scanner, if in doubt select EPP.
- Make sure that you are not trying to print and scan at the same time. Be sure that your printer has finished printing before you start to scan and vice versa: your parallel port only supports one device at a time.