 Acer File Extensions |
Optic Pro Scanner Installation and Usage
Chapter 1 Hardware Installation
Hardware Requirements
Your scanner uses an interface called an Enhanced Parallel Port (EPP).The scanner’s EPP interface allows you to scan information into your computer without the need to use an interface card. The majority of Pentium™ computers support EPP. If your computer’s printer port does not support EPP, then it is recommended that you purchase an additional parallel port interface card that supports EPP technology to maximize your scanner’s performance.Installing the Scanner’s Hardware
If you have already installed your scanner, please skip this section. The following section describes how to connect the scanner to your computer and printer.
- Turn OFF your computer, its related peripherals and disconnect all related power cables!
- If you have a printer connected to your computer, please disconnect its cable from the rear of the computer. Next, plug the disconnected printer cable into the rear of the scanner marked PRINTER: step 1.
- Eliminate any ESD (Electro Static Discharge) from the scanner cable by touching its metal connector to any metal portion of your computer. Then, plug the female end of the scanner cable into the back of the scanner marked HOST: step 2.
- Connect the male end of the SCANNER CABLE into the PC’s printer port: see Figure 1 and step 2.
Attention: If you do not have a printer connected to your computer and are not sure where the printer port is located, see your computer’s information book and read the section about the printer port connector.
- After plugging the scanner and printer cables into their respective locations, plug the power adapter into its power receptor, see step 3.
- Plug the power adapter into a standard AC outlet, see step 3. Note: When the scanner is not in use, please leave the power adapter connected to the AC outlet.
Only use the power adapter that is included with your scanner. The use of a different power adapter may damage the unit and void your warranty!
- Plug in all power cords and turn on your computer.
Back to the Top
Chapter II. Software Setup
Before installing the scanner’s software, make sure that the scanner is properly connected as described in Chapter I, Hardware Installation.
Software Installation Requirements
Your scanner comes bundled with OCR software, image-editing software, the scanner’s driver, and TWAIN software. The scanner’s software uses approximately 40 megabytes of hard disk space after it’s installed into your computer. To ensure ample room for the installation, as well as for scanning and saving images, a minimum of 100 megabytes of hard disk space is recommended.
Software Installation
The installation program called Setup/Application CD-ROM must be run from within Microsoft Windows. Once Windows is running on your system, please follow the steps below to properly install the software:
- Insert the installation CD-ROM into its disk drive.
- For Windows 95 or NT 4.0 users: The auto-run sequence will begin.
- For Windows 3.1x users: From the program manager, choose FILE, RUN and enter the letter of the disk drive, a colon and SETUP (i.e., D:SETUP).
- Follow the on-screen instructions carefully to properly install the scanner’s software into your computer.
Software Setup Troubleshooting Guide
Carefully review the steps outlined in this guide and the Quick Installation Guide that accompanied your scanner. If you still need support, you may contact us through one of three methods listed on the last page of this guide.
Installing Additional Software
Your scanner is TWAIN compliant and functions with virtually all available TWAIN compatible scanning software. When purchasing new software for your scanner, please make sure that it conforms to the TWAIN standard.
For Windows ’95 and NT 4.0 users only: Please be sure to select the correct TWAIN source when setting up any new scanning software. If you intend to use different programs with your scanner, choose the scanning source as TWAIN within the scanner setup and select the TWAIN source as your scanner.
Note: The 16-Bit TWAIN source is for using the scanner with Windows 3.1 "native" scanning programs that are 16-bit. The 32-Bit TWAIN source is for using the scanner with programs designed exclusively for Windows 95 and NT which are 32-bit. For more information about using TWAIN
Back to the Top
Chapter III. Usage and Maintenance
Operating the Scanner
Your scanner accepts documents as small as business cards and as large as letter-sized documents. However, some software programs have limitations as to the information they can handle. The capacity of the computer’s memory, or free hard disk space, can also limit the physical size of the document that you scan.
Testing the Scanner
The following test procedure checks to see if the scanner is properly functioning with your computer and the scanning software. Before testing your scanner, double-check and make sure that all connections are securely fastened.
To properly test your scanner, please perform the following steps:
- Exit all open applications and "Shut Down" your computer.
- After the computer has shut down, turn it off and wait approximately 1 minute before turning it back on.
- Note for Windows 3.1x users: Once your computer is running, enter Windows.
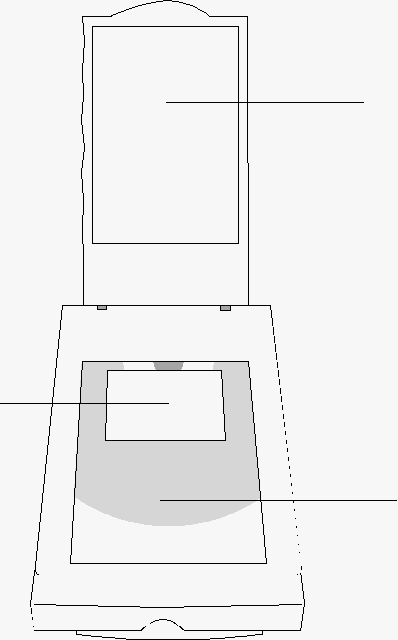
Figure 2. Flatbed Scanner
- Open the scanner’s document cover and place a picture onto the scanning window face-down.
- For Windows 95 and NT 4.0 users: Click START, PROGRAMS, PLUSTEK SCANNER, then SCANNER UTILITY.
- For Windows 3.1x users: Go to the scanner’s program group and open the Scanner Utility.
- Click on the Lamp Control tab located at the bottom of the scanner utility box.
- While looking at the scanner, click on the "Turn on lamp" and "Turn off lamp" icons (see Figure 3). This test checks to see if the scanner’s light source is properly working. Click CANCEL when done.
- Close the document cover.
- For Windows ’95 and NT users: Next, open up the image-editing program by clicking START, PROGRAMS, PLUSTEK SCANNER and then the appropriate image-editing software listed (e.g. PhotoMagic, PicturePublisher).
- For Windows 3.x users: Go to the scanner’s Program Group and open the appropriate image-editing software (e.g. PhotoMagic, PicturePublisher).
- From the FILE menu choose ACQUIRE (SCAN).
- The TWAIN dialog box will open.
- To scan, click the SCAN button.
When the scan is complete, click CANCEL to close the TWAIN dialog box, process and view the image. For more information about the TWAIN dialog box and its features, see Chapter IV. Using TWAIN.
Scanner Utility
If your scanner is working properly, please skip this section! The Scanner Utility, located inside the scanner Program Group, is for determining your printer port configuration. If your scanner does not respond, click AUTOSEARCH. Then click VERIFY PORT.
To set the amount of time the scanner’s light source stays on (the factory default is approximately 7 minutes), click the tab that reads Lamp Control. Under the heading Lamp Control, click the up or down arrows to set the time when the light source will turn off. You can also test the scanning lamp by clicking the "Turn On Lamp" and "Turn Off Lamp" buttons.
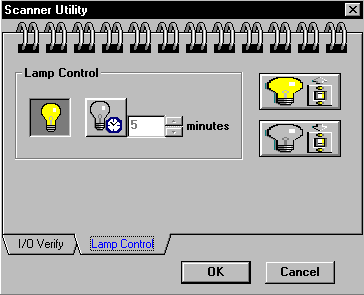
Figure 3. Scanner Utility and Verifier
Maintenance
To keep your scanner working smoothly, take a moment to review the following maintenance tips.
Avoid using the scanner in a dusty environment. When it’s not in use, keep the scanner covered. Dust particles and other foreign objects may damage the unit.
- Do not attempt to disassemble the scanner. There is danger of an electrical shock and opening your scanner will void your warranty.
- Do not subject the scanner to excessive vibration. It may damage the internal components.
- Clean the scanner’s glass by lightly spraying a non-abrasive glass cleaner onto a lint-free cloth. Then, wipe the glass thoroughly with the cloth. DO NOT SPRAY CLEANER DIRECTLY ONTO THE SCANNER’S GLASS. Excess liquid residue may "fog" or damage the scanner.
- Your scanner operates best in temperatures between 10° C to 40° C (50° F to 104° F).
Removing the Document Cover
The document cover has been designed for easy removal so that larger, three-dimensional items can be placed on the scanner bed. To remove the cover, open it until it is perpendicular to the scanner. Place your hand firmly at the back of the scanner and lift the document cover off its hinges. To replace the cover, simply snap it back into place.
Back to the Top
Chapter IV. Using TWAIN
An Introduction to TWAIN
There are a few terms that you must become familiar with to understand your scanner’s basic functions. The following chapter describes the TWAIN interface which opens when you click SCAN, or ACQUIRE from within a TWAIN compatible scanning program.
Place the mouse pointer directly over an icon within the TWAIN dialog box and a description of the icon will appear.
The TWAIN interface allows you to make important adjustments before scanning. For example, you can scan in different modes: colour, black and white, or grayscale; increase or decrease the resolution (dots per inch of an image), and adjust the brightness and/or contrast. The Prescan option allows you to adjust the margins of a document by increasing or decreasing the frame located inside the Prescan window. The TWAIN interface also provides you with statistics such as how large an image will be after scanning, in terms of both file size and physical dimensions.
Choosing TWAIN
To select the TWAIN interface: From your TWAIN compatible program, locate the scanner setup or TWAIN source option usually listed under the FILE menu and choose the appropriate TWAIN source for your scanner.
Note for Windows 95 and NT 4.0 users only: The 16-Bit source is for scanning from 16-bit applications (Windows 3.1x native architecture), and the 32-bit source is for scanning in 32-bit applications (Windows 95 and NT native architecture). Your scanner comes with 32-bit scanning applications for Windows 95 and NT 4.0, and 16-bit scanning applications for Windows 3.1x. However, if you’re using a 16-bit scanning application inside Windows 95 or NT 4.0, you must select the 16-bit TWAIN source for your scanner to properly function.
TWAIN Dialog Box Features
Settings: Choose from predefined resolution and colour settings or define your own.
![]() Margin Selector: Define and crop an area within the margin frame in the prescan window before your final scan.
Margin Selector: Define and crop an area within the margin frame in the prescan window before your final scan.
![]() Zoom Control: Left click the on the icon to zoom into an image for finer detail. Right click on the icon to zoom out.
Zoom Control: Left click the on the icon to zoom into an image for finer detail. Right click on the icon to zoom out.
Placing the mouse pointer INSIDE the margin frame box allows you to move the entire frame by dragging the mouse.
Placing the mouse pointer at the EDGE of any side of the margin allows you to reduce or expand the frame around the image (Note: Arrow direction will vary according to the side of the frame you are moving).
Control Panel & Scan Mode
There are 3 modes that you can select for scanning: RGB Colour, Grayscale, or Line-art (also called black & white).
The scanning control panel allows you to adjust the brightness and contrast, resolution, scale and the scan mode.
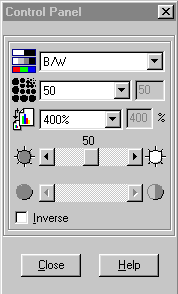
Figure 5. TWAIN Control Panel
The following pages describe the various options located inside the Control Panel.
![]() Scan Mode
Scan Mode
Line-art comprises of documents that have only 2 values (black and white). Use line-art for scanning text documents or line-art drawings.
Grayscale captures more than two colour values during scanning. When scanning photographs, or documents that contain pictures with continuous tones of gray, choose grayscale as the scanning mode.
RGB Colour captures the most information and detail during scanning, and is the best choice for scanning pictures and documents that contain detailed colour and graphics.
![]() Resolution is the number of dots per inch (dpi) or pixels that are scanned. Resolution and file size are directly related. As you increase the resolution, you also increase the amount of information gathered, and therefore the file size increases. For a listing of suggested resolutions to use with each mode, see the end of this chapter and Scanning Tips.
Resolution is the number of dots per inch (dpi) or pixels that are scanned. Resolution and file size are directly related. As you increase the resolution, you also increase the amount of information gathered, and therefore the file size increases. For a listing of suggested resolutions to use with each mode, see the end of this chapter and Scanning Tips.
![]() Scale adjusts the size of scanned images. For example, a scale setting of 200% will double the physical size of the image as well as increase the file size. Scale may also be used to reduce the physical size of text documents or images so that they won’t be cropped by the non-printing area (typically .25"- .5" margins) of an ink jet or laser printer.
Scale adjusts the size of scanned images. For example, a scale setting of 200% will double the physical size of the image as well as increase the file size. Scale may also be used to reduce the physical size of text documents or images so that they won’t be cropped by the non-printing area (typically .25"- .5" margins) of an ink jet or laser printer.
![]() Brightness is the amount of light that is concentrated onto a document while it is being scanned. Adjust the brightness by sliding the button located between the arrows either left to decrease brightness, or right to increase brightness.
Brightness is the amount of light that is concentrated onto a document while it is being scanned. Adjust the brightness by sliding the button located between the arrows either left to decrease brightness, or right to increase brightness.
![]() Contrast adjusts the tonal range of an image by lowering mid-tone values and increasing values for high and low tones. For example, use contrast to eliminate noise or shading on black & white and grayscale scans or to "clean-up" colour scans. Slide the button to adjust the contrast.
Contrast adjusts the tonal range of an image by lowering mid-tone values and increasing values for high and low tones. For example, use contrast to eliminate noise or shading on black & white and grayscale scans or to "clean-up" colour scans. Slide the button to adjust the contrast.
Inverse
When inverse is checked the colours of an entire image will become reversed. A black and white image will look like a photo negative. A colour image reverses using additive Colours.
Back to the Top
TWAIN Menu Options
Most of the menu options are considered advanced features. We strongly suggest that you first become familiar with scanning and using the Control Panel before attempting to use any of the following features. Many advanced features will also be available to you in your image-editing software after you scan.
File Menu Item
There are 5 choices located under the Filemenu item. Please read through the following descriptions to learn how to use the file menu options. If you have any further questions about any of the items located inside the file menu, click on Help located inside the TWAIN dialog box to see more information.
Save Settingsis for saving changes that you make within the TWAIN control panel. For example, if you change the resolution, brightness or any other attributes, and wish to use them for the future, save the changes by choosing Save Settings.
Save Settings Aslets you create a unique name for your changes. As an example: You can set various resolutions and scan modes and save them as a custom name (e.g. 75-dpi colour 200 scale). These changes will be applied to all future scans.
Load Default reinstates the factory setting of TWAIN. The factory default is set to RGB and 50 DPI and 50% for brightness and contrast. Note: You cannot make changes to the Default settings file.
Edit Setting Filesallows you to change the names, or delete settings that you set up and define. Note: Once you change, or delete a setting, you cannot recover it, so please be cautious!
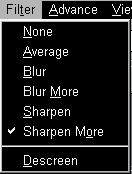 Filter Menu Item
You have six filter choices located under the Filter menu item. The filters will help you improve your scans by allowing you to sharpen images as well as remove excessive dots and distortion.
Average determines the medium depth of an image and averages adjacent pixels to make images appear softer.
Blur lets you dull the edges within an image, and decreases the contrast by making dark edges lighter and light edges darker.
Blur More: adds additional blurring.
Sharpen allows you to sharpen the edges within an image by making the edges in an image more distinct. The Sharpen filter also increases contrast by making dark edges darker and surrounding light edges lighter.
Sharpen More: adds additional sharpening.
Descreen applies filtering to images that contain moiré patterns (or herringbone) . A moiré pattern is created from scanning pictures in magazines, or printed material that use colour dithering. The descreen filter is not needed when scanning original photographs or black and white images and text, but is recommended when scanning any printed colour graphics, such as a page from a magazine.
Advanced Menu Item
The Advanced menu item has 3 options: Enhance, Preferences and Monitor Gamma. The items located under the Advanced menu are intended for user’s who are familiar with image editing tools and how they affect images. If you are just learning how to scan, then we strongly recommend not using these features until you become familiar with your scanner and its terminology.
Enhance
Enhance opens TWAIN’s colour correction options: Histogram, Tone Map and Gamma Data. Many image-editing programs already have these features. However, if the need arises to adjust the colour level of your scanned images, then enter PREFERENCES and perform the following adjustments. Note: Before adjusting the Tone, Gamma and Histogram, perform a PRESCAN so you can view the changes before you scan.
Histogram is a representation of statistical data by rectangles: widths represent class intervals and heights represent similar frequencies. Make adjustments to the histogram only when the colour balance of your scanned image does not match the original picture. Hint: We suggest leaving the histogram set to AUTO when not encountering colour depth discrepancies.
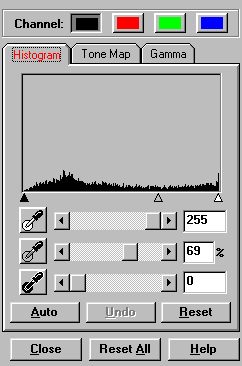
Figure 6. Histogram
Tone Map enables you to modify the tonal range and to adjust highlight, midtone, and shadow areas of an image. For example: When an image is too dark or too light, it may have hidden details that can be uncovered by using Tone Map. This usually improves the contrast of an image.
For example, when the darkest tone is 65% black, you can use the Tone Map to make it 100% black.
Gamma values follow a smooth curve, as seen below in Figure 7. By adjusting the gamma, you can change the tonal range of the selected Channel (colour). Gamma values are primarily a measure of a channel’s brightness. The larger the gamma value, the brighter the colour becomes. Note: By changing the gamma values you affect the image’s data, and influence how the image displays on your computer’s monitor, and printer.
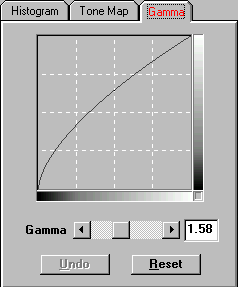
Figure 7. Gamma
Channels let you split a colour image into individual Hue, Saturation, and Lightness channels. For example, each image represents one of 3 additive colours (red, green, and blue). The name of the channel appears in the title bar. This can be useful in comparing colour ranges between the colour values, and in identifying methods when editing specific areas.
Preferences
Use the Preferences option to change the unit of measure from standard to metric, or from metric to standard. Click Preserve Prescan Image so the image displayed in the Prescan window will not be removed after you close the TWAIN dialog box.
Monitor Gamma
The Monitor Gamma option lets you adjust your monitor so you can properly view images. For example, there are different situations that might affect your ability to correctly view images: Lighting conditions, human perception of colours, and the monitor you are using are some common factors.
To correctly adjust the monitor gamma, you must first have your computer and working environment stable: including lighting, and your monitor’s brightness, contrast and colours properly adjusted. Next, select the Monitor Gamma option. Drag the slider bars until the hue inside each rectangle is the same colour as their adjacent colours (as seen below). When finished, click OK to exit.
Note: Changing the monitor gamma will affect data on the TWAIN prescan window only. You should also adjust the gamma within the image-editing program as well.
Back to the Top