Acer File Extensions |
| Plustek Action Manager Users Guide | |||||||||||||||
|---|---|---|---|---|---|---|---|---|---|---|---|---|---|---|---|
| Page 1 of 2 | Page 2 of 2 | ||||||||||||||
|
| ||||||||||||||
About This Manual & Action Manager
This User's Guide provides instructions and illustrations on how to help you operate Action Manager.
Note: It is recommended that you install the scanner and its related hardware before setting up its software and Action Manager.
The Action Manager software included with your scanner (Chapter I) works with your computer's fax/modem and fax software, Windows Print Manager™, optical character recognition (OCR) program, and Windows image editing application. When faxing documents, your fax software's send window will pop-up allowing you to enter the appropriate information: such as fax phone number and cover page.
When you are not faxing documents, you can make copies using Action Manager's Copy Action. Action Manager interfaces with the Windows Print Manager allowing you to use virtually any Windows-supported printer for generating copies.
Action Manager also allows you to perform OCR by reading text documents directly into your word processor. All you do is choose your word processor from Action Creator, and you can easily and quickly scan documents to it.
Lastly, the Scan & Save Action interfaces with your Windows image editing application, Windows Paint™, allowing you to save scanned images directly to Paint, or other imaging programs.
Action Manager Features
- Action Creator
- Copy Action
- Fax Action
- OCR Action
- Scan & Save Action
- Line art scanning
- Gray scale scanning
- Black and White scanning
- Colour scanning (colour scanner required)
- TWAIN compliance
Overview
To give you quick and easy access to faxing, copying, OCR and scanning - we provide you with a unique software interface called Action Manager. Action Manager (Figure 1) appears when you insert a document into your scanner (sheetfed scanner dependent), or when you push the button located on your flatbed scanner.
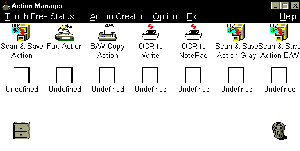
Figure 1. Action Manager Program
Figure 1 shows 14 icons that represent Actions (see number 2 above as an example). A filing cabinet for storing unused actions and a garbage can used for removing them (see 3 and 4 above). There are 3 menu choices available for customising the functionality of Action Manager (see number 1): Option, Action Creator and Touch-Free Action Status. The Option menu has 2 additional choices: Paper Detection, described later, and Execute when Windows Starts (when checked, opens and minimises Action Manager after entering Windows). Action Creator, as seen below in Figure 2, is how you actually set up, or modify actions.
Back to the Top
Action Creator (Setup)
To enter Action Creator, click once on an UNDEFINED icon with the mouse's RIGHT button, or choose the Action Creator menu item located on Action Manager's menu.
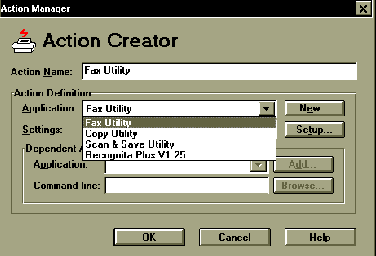
Figure 2. Action Creator dialog box.
The following describes the Action Creator setup dialog box.
The Action Name field allows you to enter a customised name as an Action (see number 1 above).
Under the heading Action Definition they're 4 choices: Application and New, Settings and Setup. The Application field is where you choose the action that you want to perform (see above and number 2). Plustek provides you with 4 Actions: Fax Action, Copy Action, Scan & Save Action and OCR Action (ExperVision TypeReader). The New option is for adding additional applications to Action Manager (much like Windows Program Manager). The only requirement for adding a program to Action Manager is you must browse your hard drive and locate the program's directory and executable file, *.EXE, (see your Windows User's Guide on how to browse a hard drive for more information). Located directly under the Application title is the Settings field (see number 3 above). The Setting field allows you to choose what scanning process that you want to perform. Depending which Application you choose, you will see different settings inside the settings field. By choosing Setup you can perform specific changes to the highlighted setting.
Under the heading Dependent Application you have 4 choices: Application, Command Line, Add and Browse (see numbers 4 & 5 above). The only time you can access the Dependent Application section is when the Scan & Save Action, or OCR Action is chosen as the Application. For more information about Dependent Application, see Scan & Save Action, or OCR Action described later in this chapter.
Now that you're familiar with the Action Creator, you can begin setting up new actions. The following sections have been written as a step-by-step guide on how to create and operate actions. Please open Action Manager now.
Back to the Top
Copy Action
The Copy Action interfaces with the Windows Print Manager and is compatible with most Windows supported printers. The following describes how to set up a new Copy action:
1. Open Action Manger.
2. Using your right mouse button, single click an UNDEFINED icon (to modify an existing copy action, right click on it).
3. Inside Action Creator, type in or modify the Action Name.
4. Under the heading Action Definition and inside the Application field, choose COPY ACTION as the application by clicking the down arrow.
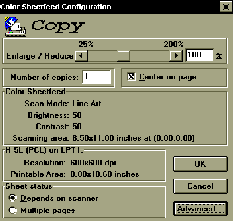
Figure 3. Copy Action (Setup dialog box)
5. Within the Settings field, choose the Setting that you want to perform: B/W is for making black and white
copies, Gray is for making grayscale copies, and Halftone is for making copies that simulate grayscale. If you have a colour scanner, choose the Colour setting for performing colour copies.
6. Choose SETUP to the right of Settings and see Figure 3 above. The following describes the Copy Action set up dialog box (Figure 3):
Enlarge/Reduce (1) allows you to increase the size, or decrease the size of the document that you're copying.
The Number of Copies (2) field allows you to enter how many copies that you want to copy (1-99).
Center on Page (3) centers a copied document to the top middle of the copy.
Sheet Status (4) allows you to select scanning options: Depends on Scanner is for scanners that have an automatic document feeder (Plustek's line of sheetfed scanners), and Multiple Pages is for scanning multiple pages with scanners that don't have an automatic document feeder (Plustek's line of flatbed scanners).
7. Choose ADVANCED located at the bottom right of Setup.
8. Choose your printer from the printer selection field (see Figure 4 below).
9. After picking the proper printer, choose OK to go back to the Setup dialog box, and click OK again to renter Action Creator.
10. Choose OK from Action Creator to reenter Action Manager.
11. Enter a document into your scanner.
12. To run the Copy Action, double-click its icon with your left mouse button.
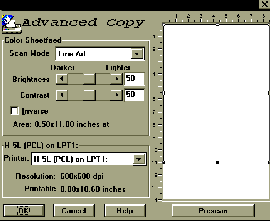
Figure 4. Advanced Setup dialog box.
Back to the Top
Fax Action
The following describes how to set up the Fax Action to fax documents using your Windows fax software. Before setting up the Fax Action, please make sure that your fax software is properly installed.
1. Using your mouse's right button, single click an UNDEFINED icon from within Action Manager (perform the same to modify an existing Fax Action).
2. Inside Action Creator enter an Action Name.
3. Under the heading Action Definition, choose FAX ACTION as the Application.
4. Within Settings, choose the setting that corresponds to the document that you want to fax: Text, Picture or TextPict (combination of both text and pictures).
5. Choose SETUP located to the right of Settings (see Figure 5, Fax Setup):
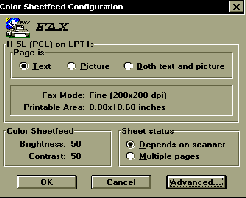
Figure 5. Fax Setup Dialog box
- Page Is determines what kind of document you intend to fax (see number 1 above): Text, Picture, or Both Text and Picture. Note: The Page Is options correspond to the actual Settings located inside theSettings Field in Action Creator.
- Fax Statistics tells you what resolution you're faxing your documents at, paper size and what the brightness and contrast are set at.
- Sheet Status allows you to select multiple scanning options (see number 2 above). Depends on Scanner is for scanners that have an automatic document feeder, and Multiple Pages is for scanners that do not have an automatic document feeder.
6. Click ADVANCED located at the bottom right of the Setup dialog box (see Figure 6, Advanced Fax Setup).
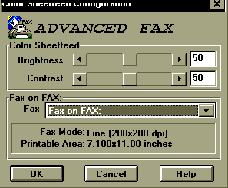
Figure 6. Advanced Fax Setup
7. Choose your fax software from the fax software selection field, see Figure 6 above.
8. Choose OK.
9. Choose OK to reenter Action Creator from the Fax Action Setup screen.
10. Click OK to reenter Action Manager.
11. Enter a document into your scanner and double-click the Fax Action to send a fax.
Back to the Top
OCR Action (ExperVision)
The OCR Setup allows you to set up Action Manager to read type written text documents to your word processor in a single step. To set up an OCR action, please perform the following:
1.Using the right mouse button, single click an UNDEFINED icon within Action Manager.
2.Enter an Action Name within the Action Name field. For example, if your word processor is MS Works, type in MS Works.
3.Under the heading Application Definition, and from within the Application field, choose OCR Action.
4.Within the Setting field, located under Application, choose the setting as MS RTF. Also available as settings are Word Perfect, AmiPro, Default (Windows Notepad) and Windows Write.
5.Under Dependent Application, choose your word processor. Note: If your word processor is not listed, click ADD to the right of Application. Enter the Application Name (the name of your word processor), and browse your directory structure and double-click on your word processor's directory to enter it. Highlight its application *.exe file and click OK.
6.Enter the drive, directory and executable file in the Command Line field (see Figure 7). For example, Word for Windows normally exists in: C:\WINWORD\WINWORD.EXE. The drive is C:\, the directory is WINWORD and the executable file is WINWORD. EXE. MS Works normally exists in C:\MSWORKS and its executable file is MSWORKS.EXE.
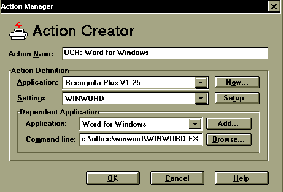
Figure 7. Setting up an OCR action to scan to Winword.
7. Choose OK.
8. You are now ready to perform OCR.
9. To run your OCR action, double-click on its icon.
Back to the Top
Continue to Page 2 of Action Manager Users Guide