Acer File Extensions |
Agfa Arcus Scanner
Missing Arcus Scanner Manuals
The manuals are located on the AGFA Scanner CD-ROM, in Adobe Acrobat PDF-file format. The CD also includes Adobe Acrobat Reader software so that you can read the manuals or print them out. No hard-copy manuals are available.
Cross - Platform Arcus
Will my scanner work on both Mac and PC platforms?
Yes. The scanners are exactly the same for both types of computers. However, if you are going from a Mac platform to a PC-based computer, you will need to purchase a SCSI controller for your PC.
Arcus Calibration Errors
Why do I get calibration errors when scanning transparencies and negatives?
The scanner was shipped with a transparency template. To avoid errors, be sure this template is being used and is installed correctly. It should be placed flat on the glass with the word AGFA toward the back of the scanner.
There are two open areas in the template. One is a large 8" x 10" hole, and the other is a small 1/2" strip cut-out. The large opening is the scanning area and the other is the calibration hole. Never put anything in the calibration hole, as doing so can also cause calibration errors.
Replacing the Arcus Transparency Lamp
To replace the lamp:
- Remove the 4 screws (2 for Arcus Plus) from the Transparency unit hinge.
- Remove the 4 screws from the glass side of the Transparency unit.
- Move the transport screws to the storage holes. See Page 10 of the Arcus Owner's Guide for more information.
- Carefully remove the top shell of the Transparency unit by lifting the shell approximately 3 inches and removing the connector plug attached to the underside of the LED display.
- Slide the lamp assembly to the center of the glass.
- Remove the 4 screws (2 for Arcus Plus) that hold the lamp in place.
- Disconnect the female connector plug.
- Disconnect the ribbon cable.
- Remove the old lamp and replace with the new one.
- Replace the 4 screws (2 for Arcus Plus) to hold the lamp in place.
- Reconnect the female connector plug.
- Reconnect the ribbon cable.
- While the Transparency unit is open, check to see that the glass is free of dust, fingerprints, and lint.
- Reattach the connector plug on the underside of the shell.
- Secure the shell and replace the 4 screws.
- Replace the 4 screws (2 for Arcus Plus) from the Transparency unit hinge.
Replacing the Arcus Scanner Lamp
To replace the lamp:
- Turn off the power and unplug the power cord of the scanner.
- Remove the original cover or Transparency unit (2 long Phillips screws).
- Remove the top cover (2 short Phillips screws) and lift it off. Be careful not to get dust or lint onto the optics mirror located under the lamp.
- Remove the small Phillips screw from the front of the chrome bracket located on the right side of the scanner.
- Hold the right end of the lamp and separate the socket plate from the lamp.
- Remove the old lamp.
- Replace the new lamp into the left socket, then reattach the right end of the lamp into the socket plate.
- Replace the small Phillips screw through the chrome bracket and black lamp housing.
- Replace the top cover (2 short Phillips screws).
- Replace the original cover or the Transparency unit (2 long Phillips screws).
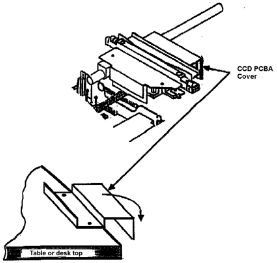
Correcting Mechanical Interference
Arcus Scanners can emit a loud chattering sound at the end of the forward scan due to mechanical interference between the CCD PCBA cover mounted to the mirror/lamp chassis and the underside of the top cover support frame.
To correct the mechanical interference:
- Turn off and unplug the scanner.
- Remove the 2 long screws at the rear (screws holding the original cover or the Transparency Option).
- If there is only an original cover, simply lift to remove it.
- If there is a Transparency option, unplug the Power Supply and communication cables, then remove it.
- Remove the 2 short screws at the front and remove the top cover.
- Locate the proper cover per the illustration, and remove it.
- Reform this cover as follows:
- Place the CCD PCBA cover on a solid surface.
- Hold it firmly and form the end down slightly in the direction indicated by the arrow.
- Reinstall it and ensure the cover clearance by running several scans.
Cleaning the Arcus Scanner
Materials needed :
- Lint-free cloth.
- Industrial non-streak glass cleaner.
- camel hair brush.
- A can of compressed air.
Cleaning scanner bed and transparency glass
Important: Never spray cleaner on, or in, the scanner.
To clean the bed or transparency glass, apply glass cleaner to a lint-free cloth and apply the cloth to the glass until all lint and dust have been removed.
Cleaning glass and calibration strip
To clean the underside of the scanner bed glass and the calibration strip:
- Turn off the scanner and remove all cables.
- Remove the two Phillips screws that hold the transparency unit or scanner cover in place.
- Remove the scanner cover.
- Remove the two Phillips screws in the top front of the scanner.
- Lift the scanner's top cover upward until it has been removed.
- Turn the cover over and place it on a soft surface that will not scratch the glass.
- Apply glass cleaner to a lint free cloth and apply the cloth to the glass until all lint and dust have been removed.
- Use compressed air to blow away any lint or dust that remains on glass.
- Clean the white calibration strip. The Arcus uses this area to calibrate the light source. It must be free of lint and dust.
Cleaning the optics mirror
While you have the scanner open, check the mirror located under the scanner lamp for dust and lint. Use a camel hair brush or compressed air and extreme care when cleaning the mirror since it is front silvered and easily scratched. When using compressed air, use short bursts along the length of the mirror. By applying air close to parallel, the dust and lint will go to the outer edges of the scanner. Do not apply air straight down on the mirror as this will lodge lint and dust further into the optics of the scanner.
Reassembling the scanner
- Place the Arcus top cover back on the scanner.
- Replace the two Phillips screws in front of the scanner.
- Place the transparency unit or original cover on the scanner bed.
- Replace the two Phillips screws that hold the transparency unit or original cover in place.
- Reattach all cables.
Cleaning the Arcus II Scanner
Required materials :
- Lint-free cloth.
- Industrial non-streak glass cleaner.
- Camel hair brush.
- Can of compressed air.
To clean the Arcus II scanner, follow the steps below.
- Turn off the scanner power switch and disconnect the power plug. Wait at least 15 minutes to allow the unit to cool down.
- Unscrew the two screws at the back of the base.
- Pull the SCSI board out enough to disconnect the ribbon cable that threads through the opening in the base (on the right)
- Remove the two screws from the upper portion of the back of the base.
- Remove the Transparency Option (TPO) from the base.
- Remove the two screws from the top back of the base. These screws will be visible when the Transparency Option is removed.
- Remove the two screws from the top front of the base and lift the plastic housing off the scanner.
- Move the carriage to the center of the glass for easier access to the mirror and calibration strip.
- Turn the cover over and remove the 11 screws on the bottom of the TPO.
- Turn the TPO over again and separate the plastic housing from the TPO.
- Apply glass cleaner to a lint-free cloth and apply the cloth to the glass until all lint and dust have been removed. Never spray cleaner directly on or in the scanner as it may penetrate the seams around the glass.
- Spray compressed air outward to eliminate any dust collected inside or on the Calibration Strips.
- To reassemble the scanner, reverse the order of the above steps.
Note: Slide the SCSI board, which the cable from the Transparency Option plugs into, to its original position before securing screws for the transparency cover. This will prevent any tension that could cause the ribbon cable to be punctured by the screws being secured.
Replacing the Arcus II Lamp
To replace the Arcus II lamp:
- Turn off the scanner power switch and disconnect the power plug. Wait at least 15 minutes to allow the unit to cool down.
- Unscrew the two screws at the back of the base.
- Pull the SCSI board out enough to disconnect the ribbon cable that threads through the opening in the base (on the right).
- Remove the two screws from the upper portion of the back of the base.
- Remove the Transparency Option (TPO) from the base.
- Remove the two screws from the top back of the base. These screws will be visible when the Transparency option is removed.
- Remove the two screws from the top front of the base and lift the plastic housing off the scanner.
- Move the carriage optical assembly backward until you can reach the lamp.
- Remove the two screws from the top of the optical assembly that covers the bulb and remove the black cover.
- Lift the lamp from the socket, working one end, then the other.
- Replace the lamp with a replacement lamp. One replacement lamp is provided with the scanner and others are available through Agfa Parts Order.
- Return the lamp cover the original position and replace the two screws.
- Replace the plastic housing and replace the four screws holding the housing.
- Thread the ribbon cable of the Transparency Option through the base and plug back into the SCSI board.
- Return the board to the base and tighten the two screws. This insures a slack cable that won't be punctured when screws are put in to attach the transparency module to the base unit.
- Replace the two screws in the back of the base to secure the Transparency Option to the base.
Installing an Arcus II on a Macintosh
- Unlock the Arcus II.
- Turn the scanner on its side, and using a small coin, turn the locking screw 1/4 turn. The screw will remain attached to the scanner for future locking.
- Power down your computer and all peripherals.
- Attach the Power cord to the scanner.
- If the scanner is the only external device, then
- Place the 25 pin end of the SCSI cable in the SCSI port of the Macintosh.
- Place the Terminator on the 50 pin end of the SCSI cable.
- Place the open end of the Terminator on the 50 pin SCSI connection on the scanner.
- If the scanner is the first external SCSI device and at least one more device is on the chain, then
- Place the 25 pin end of the SCSI cable in the SCSI port of the Macintosh.
- Place the other end of the cable on the 50 pin SCSI connection on the Scanner.
- Attach a 25 pin Macintosh SCSI cable in the open port of the scanner.
- Attach the other end of the cable into the next SCSI device.
- If Termination is needed at this point, place it on the open SCSI port of the last device on the chain.
- If the scanner is connected after another external SCSI device and is not connected directly to the Macintosh, then
- Attach the 25 pin Macintosh SCSI cable in the open port of the scanner.
- Attach the other end of the cable to the next SCSI device.
- If Termination is needed at this point, place it on the open SCSI port of the last device on the chain.
- Clear all images from the scan bed.
- Turn on the power on the scanner and all peripherals.
- Turn on the Macintosh.
- Install the scanner drivers.
Communication Errors
A communication error may be indicated when you receive the following error message:
Check the Ready lights on the scanner. If they are on, then
- Remove other peripherals from the SCSI chain. Check the connections and confirm that the SCSI Terminator is at the last peripheral on the SCSI chain.
- Start up the scanner and the Macintosh.
- Launch Photoshop.
- Select Acquire from the File menu and launch the FotoLook driver.
- If the problem continues, turn off the Macintosh System extensions by holding down the Shift key when restarting the Macintosh.
If they are not on, then
- Power down the scanner and workstation.
- Clear all images and materials from the scan bed.
- Unplug the SCSI cable from other peripherals and the Mac.
- Power on the scanner.
Check the scanner mode. Does the scanner get into the Ready mode?
If yes:
- Reconnect the SCSI peripherals one by one.
- Check that the connections are solid.
- Check that the last peripheral on the SCSI chain is terminated.
- Turn on the scanner, making sure that nothing is on the scan bed when powering up.
- Turn on the other peripherals.
- Turn on the Mac.
- Launch Photoshop.
- Launch driver.
- Result: The FotoLook driver should then appear.
- If the problem persists, re-install the FotoLook driver.
If no, then you need to contact Agfa.