Acer File Extensions |
Hewlett Packard DeskJet 895cxi
If you need the user manual or software for your printer you can download it from the Printer Support section of the Hewlett Packard website.
Cleaning the Printer
Use a soft cloth moistened with water to wipe off dust, smudges, and stains. The interior of the printer does not require cleaning. Keep fluids away from the interior of the printer.
Do not lubricate the rod on which the Inkjet print cartridge cradles move. Noise is normal when the cradle is moving back and forth within the printer, when the printer is new. With use, your HP DeskJet printer will become quieter.
Cleaning the Inkjet print cartridges
Cleaning your Inkjet print cartridges can improve the quality of printing. If your printed page is missing lines or dots, or if it contains ink streaks, then do the following,
Cleaning the Inkjet print cartridges from the HP Toolbox
- Double-click the HP Toolbox icon on the computer screen.
- Click the Printer Services tab.
- Click Clean the print cartridges and follow the directions on the screen.
- If print quality improves by going through this sequence once, but the quality is still not quite good enough, repeat the procedure.
Manually Cleaning the Cartridges
For this you will need the following materials
- Cotton swabs or any soft material that will not come apart or leave fibers (for example, a piece of clean cotton cloth, such as a handkerchief).
- Distilled, filtered, or bottled water. (Tap water may contain contaminants that can damage the inkjet print cartridges)
- Scrap paper or paper towel on which to set the Inkjet print cartridges while you are working.
Then follow these procedures,
- Turn the HP DeskJet 880/895C series printer on and lift the printer's top cover.
- After the Inkjet print cartridges have moved to the center of the printer, unplug the power cord from the back of the printer.
- Remove the Inkjet print cartridges from the cradles and place them with the widest side down on their sides onto a scrap piece of paper. CAUTION: Once you have removed the Inkjet print cartridges, make sure that they are not outside of the HP DeskJet 880/895C series printer longer than 30 minutes.
- Grasp the top of the black Inkjet print cartridge.
- Dip a clean cotton swab into distilled water and squeeze any excess water from the swab.
- Clean the face and edges of the Inkjet print cartridge as shown. Do not wipe the nozzle plate. CAUTION: Be careful not to touch the ink nozzles on the bottom of the print cartridge or the copper contacts on the back of the print cartridge. Touching these parts of the Inkjet print cartridge can result in clogs, ink failure, or bad electrical connection.
- Hold the Inkjet print cartridge up to the light to inspect for fibers on the face and edges. If fibers are still present, repeat the previous 2 steps.
- Do the same for the tricolor inkjet print cartridge, using a clean, moistened cotton swab to avoid any contamination.
- Position yourself at eye level with the printer.
- Locate the cradle that held the Inkjet print cartridges.
- Using clean, moistened swabs, wipe the underside of each wall of the carriage where fibers may collect and come in contact with the paper. Repeat until no ink residue is seen on a clean swab.
- Reinstall the Inkjet print cartridges and close the printer's top cover.
- Reinsert the power cord into the back of the printer.
- Print a test page. On the Printer Services tab of the HP Toolbox, click Print a self-test page.
Printing a Test Page
You can print a test page from the printer in three different ways. In the first two methods, the sample page and the hardware self-test, the printer does not need to be hooked up to the computer, and the printer software does not need to be installed. The third method can be used after the printer software is already installed on the computer, to print a test page from the Toolbox.
Sample Page
- Turn the printer off and remove the cable that connects the printer to the computer.
- Turn the printer back on.
- Press and hold the Resume (bottom) button for approximately 5 seconds.
The sample page should look like the illustration below.
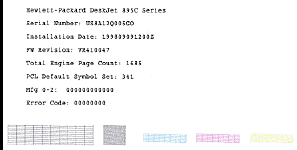
Self-Test Page
- Turn the printer off and remove the cable that connects the printer to the computer.
- Turn the printer back on.
- Press and hold the Power (top) button. Press the Resume button 4 times and then release the Power button.
- The self-test page will print with a report containing the printer model name and serial number; it will look like the illustration shown below.
Toolbox Test Page
- Double-click the HP Toolbox icon on your desktop.
- On the Printer Services tab of the HP Toolbox, click Print a test page.
- The test page should look like the illustration below.
Clearing a Paper Jam
If the paper jams in the printer:
- Pull the paper out of either the IN tray or the OUT tray.
- Press the Resume button on the front of the printer. The printer turns off and then on again on its own.
- Print your document again.
If the paper jams in the back of the printer:
- If you can not reach the jammed paper, turn the knob on the rear access door at the back of the printer .25 turn counter clockwise and remove the door.
- Pull the jammed paper out of the printer and then replace the rear access door, making sure to lock the door by turning the knob clockwise to the locked position.
- Press the Resume button on the front of the printer.
- Print your document again. If you cannot see the paper causing the jam, check to see if a label has come unglued from a label sheet while going through the printer.
Mustek Scanners
During installation, the printer driver will not find bidirectional communication if a Mustek scanner has already been installed on the parallel port. -Or- If a Mustek scanner is installed after the printer driver has loaded successfully with full bidirectional communication, a "Printer Not Responding" or "Lost Communication with the Printer" message appears when you attempt to print.
Follow the steps below to turn off the cover sensor switch for the Mustek scanner. The cover sensor automatically starts the Scan Wizard software when the scanner cover is opened.
- Right-click the Direct Scan icon next to the clock on the Taskbar.
- Select Cover Driven to turn off the cover sensor feature.
If you only want to disable the feature until Windows is restarted,
- Press CTRL + ALT + DELETE to open the Close Program screen.
- Click "Watch" to highlight it.
- Select the End Task button.
- If you were unable to install the printer driver successfully, you can reinstall the printer driver now for full bidirectional communication.
- Try to print the document again.
Error 10 Occurs when Installing Driver v11.0
During the installation of the printer driver, an 'Error 10 - Unable to install' message appears. If you click Ignore, an 'Error 7 - Registry Update' message appears.
If you receive the above error, it means that the driver installer is unable to locate a parallel port in Windows 95/98.
Use Device Manager to identify the presence of the parallel port in Windows 95/98. To access the Device Manager, use the following steps:
- With your right mouse button, click the My Computer icon and then click Properties.
- Click the Device Manager tab and double-click "Ports (COM & LPT)".
- If an LPT port is not present, a red "x" or a yellow dot with an exclamation point will appear on the LPT port icon.
- Remove any LPT Port(s) listed and restart the computer.
- If the problem persists it will be necessary to contact your computer support to configure the parallel port.
Front Panel Lights and Buttons
Two buttons and three lights are located on the front of the printer. The lights tell you when the printer is working or when it needs your attention. The buttons are used to help control the printer.
| Buttons and Lights | What Do They Do? |
|---|---|
| Power Button and Light | Push the Power button to turn the printer off and on. When lit, the light shows that the printer is turned on. |
| Resume Button and Light | The light blinks when there is a problem with paper. When the problem is corrected, press the button. |
| Print Cartridge Light | The light blinks when there is a problem with a print cartridge. When the problem is corrected and the top cover is closed, the light will stop blinking. |
What Do the Printer Lights Mean ?
| Front Panel Status | Explanation | Options |
|---|---|---|
| All the lights are off. | The printer is switched off or asleep. | Press the Power button to turn the printer on. The printer should turn on automatically when you send a print job to it. |
| The Power light is on. | The printer is ready. | The printer is ready to print a document. |
| The Power light is blinking. | The printer is busy printing or receiving data. | You may not have allowed enough time to print. When a document has many fonts or graphics or uses complex color like a color photo, it takes longer to begin printing. |
| The Power light is on and the Print Cartridge light is blinking. | Possible causes: The front cover is open. Make sure the front cover is completely closed. The print cartridge is missing. Make sure the print cartridge has been installed correctly. The print cartridge is broken or incompatible. Lift the front cover and wait for the print-cartridge cradle to slide out. Check the part numbers on the print cartridge: Black 51645A Colour C1823A | If the print cartridges are compatible and correctly installed, they may be defective. Try replacing the print cartridges. If the error message still occurs, you may have a hardware failure. Call the HP Customer Care Center listed in the printer User's Guide. |
| The Power light is on and the Resume light is blinking. | There is a paper problem. | The printer is out of paper. Make sure there is paper in the IN tray. The printer did not pick up the paper. Sometimes the printer will miss the paper when it tries to pick up a sheet. Press the Resume button to try again. Paper is jammed in the printer. The paper may be caught inside the printer. Clear the paper jam. The printer is waiting to eject banner paper. If you have printed a banner, the printer is waiting for you to remove the extra banner paper from the IN tray before ejecting the last page of the banner. Remove the banner paper, and then press the Resume button. The Banner Lever does not match the driver setting. Check the setting. The printer is waiting to drop the paper. If you are printing on transparencies or other slow drying media, the printer may be waiting for the ink to dry before dropping the page. If you press the Resume button, the page will be dropped immediately. |
| The Power light and the Resume light are blinking alternately. | The paper stalled. | There may be a paper problem. Make sure the paper is loaded correctly. Turn the printer off and then on again. |
| The Power light and the Resume light are blinking together. | The print cartridge carriage (cradle) stalled. | There may be a carriage motion problem. Open the printer's top cover and check the following: Make sure all tape is removed from the print cartridge cradles. Remove any packing materials from the printer. Check for paper that has crumpled and jammed in the printer. Remove the excess paper and then clear the paper jam from the rollers. When there are no obstructions, turn the printer off and then on again. |
| All the lights are blinking together. | There is a printer error. | Turn the printer off and then turn it back on. If the error message still occurs, you may have a hardware failure. Call the HP Customer Care Center listed in the printer User's Guide. |
Installing FontSmart from the Printer Software CD
To install the FontSmart feature for your printer, follow the steps below:
- Click, Start and Run.
- Insert the HP DeskJet 895C series printer software CD in the appropriate CD-ROM drive.
- In the Open line, type SETUP.EXE. For example, if your CD is the D drive, type the following and click OK: D:\SETUP.EXE
- In the next screen, click the Printing Essentials box.
- Select HP FontSmart.
- Click Install FontSmart.
- Follow the steps on the screen to complete installation.
Unable to Print from a VIA USB Host Controller
Some versions of the VIA USB host controller are incompatible with the HP DeskJet 895C series printer. The printer driver software installs correctly; but, when you attempt to print, you receive error messages such as "There was an error writing to USB/DeskJet 895C printer serial # for the printer (HP DeskJet 895C Series Printer): Your file waiting to be printed was deleted" or "There was an error writing to USB/DeskJet 895C printer serial # for the printer (HP DeskJet 895C Series Printer): The printer is not ready. Make sure that it is turned on and online. To continue printing, click retry. Windows will automatically retry in 5 secs.". The errors may be intermittent, or occur on every print job.
Determining whether your PC has a VIA USB host controller
To tell if you have a VIA host controller, look at your system properties by following these steps:
- Click Start, Settings, and then Control Panel.
- In the Control Panel window, double-click the System icon.
- Click the Device Manager tab and scroll down until you locate the Universal Serial Bus Controller.
- A VIA controller that does not work with the HP DeskJet 895 USB interface may be similar to this: VIAVT 83C572NT 82C586 PCI to USB Universal Host Controller
Solution
If you have a computer with a VIA chip set, you can get the full functionality of your printer by connecting to the computer through the parallel port.
Or, if you would like to continue using a USB connection, VIA provides a patch for their host controller, which you can download here - usbf108.exe.
Disabling Bidirectional Communication
Printing problems may occur and you may receive error messages when the HP Printing System for Windows is installed on a computer that does not have a bidirectional port or a bidirectional printer cable. Printing problems specific to bidirectional communication (two-way communication) can be fixed by upgrading your computer's hardware so that it does have a bidirectional port or a bidirectional printer cable, or by turning off the bidirectional function in your printer driver software.
If you turn off the bidirectional communication in your printer driver, the print quality will not be affected. However, some of the advanced features of the Status Monitor or HP Toolbox will be disabled:
- You will no longer receive reminders to align the print cartridges after a new print cartridge is installed.
- You will no longer receive error messages associated with the print cartridges.
- You will no longer receive error messages associated with the banner lever.
To disable Bi-Directional Communications, follow these steps,
- Click Start and then click Run.
- At the prompt run the program HPFCFG15.EXE
- Click Continue in the message window.
- Remove the X next to Print Cartridge Query and Bi-directional Communication.
- Click OK.
- Click Restart Windows.
Printer Status Dialog Messages
This will help you understand printer error messages you may encounter when printing from your printer.
| Message | Description | Action Required |
|---|---|---|
| Low Memory | There is not enough memory available to optimally print the document. This may result in slower printing and lower print quality. | Click OK to continue printing. |
| Not Enough Memory | There is not enough memory available to print the document. | Free additional memory by closing other programs. Try printing again. |
| Out of Disk Space | There is not enough disk space to print this job. | Free up some disk space and try printing again. |
| Cannot Print File | No application is associated with this file. | Click OK. |
| Cannot Print File | The associated application could not be started. | Click OK. |
| Disk or File Error | An error has occurred while trying to read or write a file on the disk. | Cancel printing; then, try printing again. |
| Port Configuration | For two-way communication, specific Port settings must be set. | Do the following: 1. Open the Printers folder, click the icon for your HP DeskJet printer, and then click Properties on the File menu. 2. If you are using Windows 95, click the Details tab. If you are using Windows NT, click the Ports tab. 3. If you are using Windows 95, click Spool Settings. If you are using Windows NT, proceed to step 4. 4. Click the Enable Bidirectional Support box. |
| Printer Error | Two-way communication with the printer cannot be established. | Click Troubleshoot for problem solving information. |
| Printer Error | The computer has lost communication with the printer. | Cancel printing, turn the printer off, and then turn it back on. Try printing again. |
| Printer Not Responding | Attempting to send data to the printer and the printer is not responding. | Click Troubleshoot for problem-solving information. |
| Printer Port Problem | There is a problem accessing the printer port. | Click Troubleshoot for problem-solving information. |
| DOS Spooling Error | The printer could not spool the current DOS print job to the selected port. | Make sure you are printing to a parallel port. |
| Incompatible Print Manager | The current Print Manager is not compatible with the installed HP Printer Driver. | Reinstall the HP printing software disks that came with your printer. Try printing again. |
| Printer Driver Problem | Data required by the printer driver cannot be found or has been corrupted. | Restart Windows and try printing again. |
| Printer Driver Problem | The printer driver files or data cannot be found or have been corrupted. | Reinstall the HP printing software disks that came with your printer. Try printing again. |
| Software Already Running | This file could not be opened because it is already running. | Click OK. |
| Software Utility Error | A necessary HP software utility is either missing or corrupted. | Cancel printing. Reinstall the HP printing software disks that came with your printer and try printing again. |
| Spooling Error | Error spooling the print job | Turn off Spooling and try printing again. 1. Open the Printers folder, click the icon for your HP DeskJet printer, and then click Properties on the File menu. 2. If you are using Windows 95, click the Details tab. If you are using Windows NT, click the Scheduling tab. 3. If you are using Windows 95, click Spool Settings. If you are using Windows NT, proceed to step 4. 4. Click the Print Directly to The Printer box and then click OK. |
| Mechanism Error | The print cartridge cradle cannot move. | Check under the cover for a paper jam or other obstruction. |
| Top Cover Open | The printer cannot print because the top cover is open. | Close the top cover or cancel printing. |
| Dry Time Pause | The printer is allowing the page on the bottom to dry. | Remove the paper from the output tray and carefully set it aside to dry. Then, click OK to continue printing. |
| Incompatible Cartridge | The black print cartridge is not compatible with this printer. | Refer to the print cartridge packaging to ensure that it is designed for your printer model. |
| Incompatible Cartridge | The color print cartridge is not compatible with this printer. | Refer to the print cartridge packaging to ensure that it is designed for your printer model. |
| Incorrect Installation | Try removing the black print cartridge and reinstalling it. | Click OK to continue printing. |
| Incorrect Installation | Try removing the color print cartridge and reinstalling it. | Click OK to continue printing. |
| Incorrect Printer | The printer currently attached is not the same as the printer selected when the printer software was installed. | Click OK. |
| Low or Out of Ink | The black print cartridge is low on ink or out of ink. | Click OK. |
| Low or Out of Ink | The color print cartridge is low on ink or out of ink. | Click OK. |
| New Print Cartridge | A new print cartridge has been installed. | For best print quality, cancel printing and align the print cartridges in the HP Toolbox. |
| New Print Cartridge | A new print cartridge has been installed. | Click align for best print quality. Your document will print after alignment is finished. You may align later from the HP DeskJet Toolbox. |
| Print Cartridge Error | The black print cartridge is unusable. | Install a new black print cartridge and try printing again. |
| Print Cartridge Error | The color print cartridge is unusable. | Install a new color print cartridge and try printing again. |
| Print Cartridge Not Found | The black print cartridge is not installed in the printer. | Install a black print cartridge and click OK to continue printing. |
| Print Cartridge Not Found | The color print cartridge is not installed in the printer. | Install a color print cartridge and click OK to continue printing. |
| Banner Length Exceeded | Z-fold banners longer than 36 pages cannot be printed. | Reformat your banner and try printing again. |
| Banner Printing Complete | Banner printing is complete. | Tear off any excess paper in the IN tray; then, press the Resume button on the front of the printer, as necessary, to eject the paper fully. |
| Out of Paper | The printer is out of paper. | Load more paper and then press the "Resume" button on the front of the printer. |
| Paper Jam | The printer has a paper jam. | Clear the paper jam and then try printing again. |
| Paper Jam | The printer has a paper jam, or banner paper is loaded. | Clear the paper jam and then press the "Resume" button on the front of the printer. Try printing again. |
| Paper Mismatch | The position of the printer's banner lever does not match the setting in the printer software. | Click OK and make the appropriate adjustments. |
| Paper Size Error | The specified paper size is not valid. | Valid widths are 5 to 8.5 inches (127 to 215 mm). Valid lengths are 5.83 to 14 inches (148 to 356mm). |
| Paper Size Error | The specified paper size is different from the paper size in the printer's IN tray. | The output was truncated to fit the paper in the HP DeskJet 880C/895C series printer. Some output may have been lost. |
| User Notice | Power button was not used to power off the printer. | If the printer was printing when it was powered off, the life of the print cartridges may be reduced. |