Acer File Extensions |
Canon BJC-620 Printer
General
Alternative Drivers
Drivers you can use if the BJC-620 driver is not available.
- DOS : BJ-200/200e/200ex (BJ Mode/Black)
- DOS : Epson LQ2550 (LQ Mode Colour/Black)
Cartridges
- BJI-201BkHC - Black Ink Tank
- BJI-201C - Cyan Colour Ink Tank
- BJI-201M - Magenta Colour Ink Tank
- BJI-201Y - Yellow Colour Ink Tank
Cleaning Print Head
Cleaning ALL Print Heads : With the printer switched on press the PRINT MODE and ENV buttons at the same time until the printer beeps and the INK and ENV lights flash. Press the print mode button six times OR until all lights are flashing. To start the cleaning, press the ENV button until the printer beeps. When the cleaning is complete the indicator lights stop flashing.
Cleaning Individual Print Heads : First make sure the printer is turned on. On the printer's control panel press the PRINT MODE and ENV buttons at the same time until the printer beeps and the Ink and ENV lights flash. Press the print mode button until the light indicating the colour of the ink cartridge that needs to be cleaned is flashing. To start the cleaning, press the ENV button until the printer beeps. When the cleaning is complete, the indicator lights stop flashing.
Self Tests
Colour Pattern : With the Printer switched off, press and hold the FF button, then press the POWER button until the printer beeps. When the POWER light starts to flash, release both buttons. When the POWER light stops flashing, the printer starts to print the color pattern. To stop printing the test, press the POWER button to turn off the printer.
Font Pattern : With the printer switched off, press and hold the PRINT MODE button, then press the POWER button until the printer beeps. When the POWER light starts to flash, release both buttons. When the POWER light stops flashing, the printer starts to print the Font Pattern. To stop printing the test, press the POWER button to turn off the printer.
Nozzle Check Pattern : With the printer switched off, press and hold the ONLINE button, then press the POWER button until the printer beeps. When the POWER light starts to flash, release both buttons. When the POWER light stops flashing, the printer starts to print the Nozzle Check Pattern. To stop printing the test, press the POWER button to turn off the printer.
Serial Number
Location - Cream coloured label on the back of the printer near the power cord
Prefixes - TYN...
Special Paper
- CF-102A4 - Transparencies. Used for producing overhead transparencies.
- GP-101A4 - Glossy Paper. Heavier coated paper, used for graphics.
- LC-101A4 - Coated A4 Paper. Coated paper used for high quality print.
- LC-301A4 - BubbleJet Paper A4. Lightly coated, water resistant everyday usage paper.
- FS-101 - Fabric Sheet. Allows images to be printed onto 100% Cotton fabric (Machine Washable).
- BF-102A4 - Back Print Film A4. Used to produce back-lit displays.
- HG-101 - High Gloss Film A4. Gives documents a Gloss finish, used for reports/graphics.
- TR-101 - T-Shirt Transfer. Images can be printed onto the transfer material and then ironed onto T-shirts, Sweaters, etc..
Known Issues
Sharing With Other Parallel Port Devices
The Canon BJC-620 printer has a bidirectional communication feature. This feature does not share the parallel port, and can cause problems when you try and share the parallel port with other devices, for example scanners. You can correct this problem by downloading the Non-WPS Printer Drivers from Canon's Website.
After installing new Cartidges, the Error light flashes and ink light is lit
The Ink detection may require callibration, as follows
- Turn off the printer
- Remove all the ink tanks. (Cartridges)
- Unplug the printer (maybe easiest to unplug from back of printer).
- Set paper thickness lever to the plain paper position (DOWN). (Lever beside black cartridge)
- Close the printer cover.
- Hold POWER and FF buttons while plugging the printer in.
- After tone(s) and print head mechanism stops moving, press ONLINE.
- You should hear more tone(s).
- Set paper thickness lever to the envelope position (UP).
- Close the Printer Cover.
- Press FF button. There should be more tone(s) and then it shuts itself off.
- Unplug the printer.
- Install all ink tanks.(Cartridges)
- Set paper thickness lever back to the plain paper position.
Problems using Printer with Logitech Pagescan
When the printer is connected to the computer through a Logitech Pagescan, it does not function correctly. The solution is to remove the word WAKEUP.DLL from the system.ini file.
Ink Sensor / Paper Thickness Calibration fails
This can be caused by dirt on the sensor preventing proper operation. To clear this,
- Open the cover on the printer to expose the cartridges.
- Unplug printer
- Replug printer
- Power up printer
- When the printhead moves away from the right, quickly unplug the printer.
- At this point you should be able to move the printhead to the left,
- The INK SENSOR will be exposed well enough to clean, the sensor is located just behind the front silver rail.
- Clean the Sensor and area near it.
- Replug in the printer and Power up
Colours not Printing properly
Make sure that you have printer driver set to Colour Matching.
Windows 95 crashes after installing printer driver.
Computer lockups after rebooting from Windows Printing System driver installation. This typically happens after upgrading from Windows 3.1x to Windows 95. The solution is to edit the System.ini file and remove the MinTimeSlice line.
Error Codes
| Power | Beeps | Error | Online | BK | C | M | Y | Ink | Env | Error Condition | Solution |
|---|---|---|---|---|---|---|---|---|---|---|---|
| On | OFF | ON | Ready | ||||||||
| On | 2 | On | Paper jam or out of paper | Add paper or remove the paper jam and press ONLINE to continue | |||||||
| On | 2 | Blink | Blink | WASTE INK warning | You can continue printing by pressing ONLINE however the printer is due for service | ||||||
| On | 2 | Blink | Blink | INK OUT - The printer is out of INK , Note any combination of BK, C, M or Y may blink | Replace or check the ink cartridges that have BLINKING lights - BK = Black, C = CYAN, M = Magenta, Y = Yellow | ||||||
| On | 3 | Blink | On | This indicates Carriage Error (Printhead movement) | See notes below on Encoder Errors. If that doesn't work, printer requires a service | ||||||
| On | 3 | Blink | On | Home Position Error (Printhead movement) | Requires Service | ||||||
| On | 3 | Blink | On | On | Encoder Error (Printhead movement) | See notes below on Encoder Errors. If that doesn't work, printer requires a service | |||||
| On | 3 | Blink | On | Paper Feed Motor Error | Requires Service | ||||||
| On | 3 | Blink | On | On | Auto Sheet Feeder Home Position Error | Requires Service | |||||
| On | 3 | Blink | On | On | Internal Temperature Error | Requires Service | |||||
| On | 3 | Blink | On | WASTE INK is Full | Requires Service | ||||||
| On | 3 | Blink | On | On | This indicates EEPROM Error | Requires Service | |||||
| On | 3 | Blink | ON | ROM Error | Requires Service | ||||||
| On | 3 | Blink | On | On | RAM Error | Requires Service | |||||
| On | 3 | Blink | On | On | Gate Array Error | Requires Service | |||||
| On | 3 | Blink | On | On | On | Ink Detection | See Notes for Recalibration Method | ||||
| On | 3 | Blink | PrintHead Error | Requires Service, Possibly remove printhead and reinstall may resolve problem. Any combination of BK,C,M,Y may be be blinking |
Notes - Encoder Error
If you receive an encoder error, try the following,
- Power off the printer
- Unplug the printer power cord
- Hold PRINT MODE and POWER buttons and plug in the printer's cord
- Release the buttons after the tones (beeps)
- Wait until the printer finishes, and power off
- Unplug the printer
- Plug it back in
Print mode is the button below the 4 Leds (BkCMY)
Notes - Recalibration Procedure
- Turn off the printer
- Remove all the ink tanks. (Cartridges)
- Unplug the printer (maybe easiest to unplug from back of printer).
- Set paper thickness lever to the plain paper position (DOWN). (Lever beside black cartridge)
- Close the printer cover.
- Hold POWER and FF buttons while plugging the printer in.
- After tone(s) and print head mechanism stops moving, press ONLINE.
- You should hear more tone(s).
- Set paper thickness lever to the envelope position (UP).
- Close the Printer Cover.
- Press FF button. There should be more tone(s) and then it shuts itself off.
- Unplug the printer.
- Install all ink tanks.(Cartridges)
- Set paper thickness lever back to the plain paper position.
Error After Cleaning Waste Ink
Thanks to Ola Fj�llman for this tip -
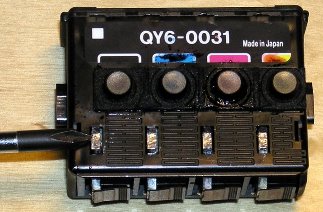
I have successfully cleaned the waste ink (no tools necessary!) and wash the sponges in water (use gloves!). And I installed new cartridges, and reset waste ink warning, calibrated the new cartridges, and performed cleaning. Despite all this, the printer didn't work. Three beeps, error blinking, and all cartridges blinking.
On the printer head there was corrosion on the tin-plates. After removing the corrosion with a knife the printer operates normal again! Here is an image of my printer head and a screwdriver pointing to the tin-plates where I removed the corrosion (all four tin-plates).
Waste Error Reset
1: Unplug Power Cord
2: Hold POWER and FF and Print Mode buttons
3: Plug in Power Cord
4: Release after the beeps
DIP Switches
BJ Mode
| Switch | Function | On | OFF | Factory Setting |
|---|---|---|---|---|
| 1 | Horizontal Print Position | A4 | Letter | OFF |
| 2 | Text Scale Mode | Enabled | Disabled | OFF |
| 3 | Character Set | Set 2 | Set 1 | OFF |
| 4 | Code Page | See Table 1 | OFF | |
| 5 | Code Page | See Table 1 | OFF | |
| 6 | Code Page | See Table 1 | OFF | |
| 7 | Page Length | 12 inches | 11 Inches | OFF |
| 8 | Alternate Graphics Mode | Enabled | Disabled | OFF |
| 9 | Automatic Carriage Return | Line Feed = LF+CR | Line Feed = LF | OFF |
| 10 | Automatic Line Feed | CR + LF | CR Only | OFF |
| 11 | Printer Control Mode (DOS) | Epson LQ-2550 | BJ-10/IBM X24e | OFF |
| 12 | Not Used | OFF | ||
Table 1 - Code Page for BJ mode
| Code Page | Switch 4 | Switch 5 | Switch 6 |
|---|---|---|---|
| 850 | OFF | OFF | ON |
| 437 | OFF | OFF | OFF |
| 860 | ON | ON | ON |
| 863 | OFF | ON | ON |
| 865 | ON | OFF | OFF |
LQ MODE
| Switch | Function | On | Off | Factory Setting |
|---|---|---|---|---|
| 1 | Horizontal Print Position | A4 | Letter | OFF |
| 2 | Text Scale Mode | Enabled | Disabled | OFF |
| 3 | Character Set | Graphics | Italics | OFF |
| 4 | Int'l Character Set | See Table 2 | OFF | |
| 5 | Int'l Character Set | See Table 2 | OFF | |
| 6 | Int'l Character Set | See Table 2 | OFF | |
| 7 | Typeface | See Table 3 | OFF | |
| 8 | Typeface | See Table 3 | OFF | |
| 9 | Typeface | See Table 3 | OFF | |
| 10 | Automatic Line Feed | CR + LF | LF | OFF |
| 11 | Printer Control Mode (DOS) | Epson LQ-510 | BJ-10/IBM X24e | ON |
| 12 | Not Used | OFF | ||
Table 2 : International Character Set
| Country | Switch 4 | Switch 5 | Switch 6 |
|---|---|---|---|
| USA | OFF | OFF | OFF |
| UK | OFF | OFF | ON |
| Germany | OFF | ON | OFF |
| France | OFF | ON | ON |
| Denmark | ON | OFF | OFF |
| Sweden | ON | OFF | ON |
| Italy | ON | ON | OFF |
| Spain | ON | ON | ON |
Table 3 : Typeface
| Typeface | Switch 7 | Switch 8 | Switch 9 |
|---|---|---|---|
| Roman | OFF | OFF | OFF |
| Sans Serif | OFF | OFF | ON |
| Draft | OFF | ON | OFF |
| Courier | OFF | ON | ON |
| Prestige | ON | OFF | OFF |
| Script | ON | OFF | ON |
| Orator | ON | ON | OFF |
| Orator-S | ON | ON | ON |