Acer File Extensions |
Apricot MS530 Information
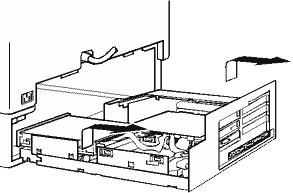
Opening the MS530 System Unit
1. Turn off the system unit.
2. If your AC power outlets have switches, set them to their Off positions.
3. Unplug the power cord from the rear of the system unit.
4. Unscrew the three screws (shown below), and put them safely to one side.
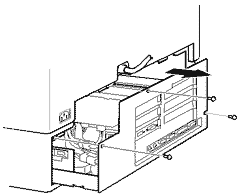
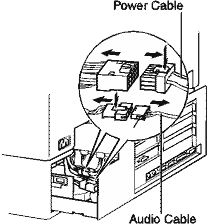
5. Pull out the LPX cage so as to disconnect the two internal cables and, then gently pull the LPX cage out.
 ;
;
Using the Front Bezel Controls
The computer comes with many front panel controls, and activity indicators which are all relatively simple to use:
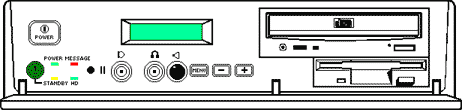
The POWER button is used to turn the computer on and off. This button also controls the power supply through the AC power to the monitor.
The following table lists the colours of the various LEDs on the front bezel and explains there meaning when active.
Indicator LED Meaning
Power On (Green) - The system is powered
Standby (Yellow) - The monitor has entered standby mode
Message (Red) - Unread message in the Message Centre
Hard Disk Drive (Green) - The computer is using the hard disk drive
The Control Function Display
The LCD Control Function Display is a display panel which informs the user of any unexpected situations such as power loss, loss in signal etc. It has a yellow back light with black text. When the computer is switched on the LCD displays the horizontal and vertical refresh rates of the monitor.
The LCD Control Function Display also has a menu which allows the user to alter the following monitor settings:
| Menu | Option | Function | ||
|---|---|---|---|---|
| HYP | Hypersound | Alters the sound spectrum. | ||
| CNT | Contrast | Alters the contrast level of the monitor. | ||
| BRT | Brightness | Alters the black level of the screen. | ||
| HSC | H-Size | Alters the horizontal size of the image on the screen. | ||
| HPC | H-Position | Alters the horizontal position of the image on the screen. | ||
| VSC | V-Size | Alters the vertical size of the image on the screen. | ||
| VPC | V-Position | Alters the vertical position of the image on the screen. | ||
| PCC | Pincushion | Straightens the left and right sides of the screen image. | ||
| TRA | Trapezoid | Adjusts the parallelism of the left and right sides of the screen image. | ||
| RRC | Raster Rotation | Adjusts the rotation or twist of the picture. | ||
| PRL | Parallelogram | Adjusts the vertical slant or tilt of the screen image. | ||
| CTC | Colour Temp | Adjusts the level of blue and red colour in the screen image. | ||
| DEG | Degauss | This is used to eliminate possible colour shading or impurity. | ||
| CNV | H-Static-Conv | Adjusts the horizontal alignment of the red, green and blue beams. | ||
To alter any of the above features, the MENU button needs to be pressed to display the menu:
![]()
The + and - buttons (next to the MENU button) can be used to toggle between the various option s in the menu. As you pass through the various options they begin to flash. To select the option press the MENU button when the required option is flashing.
You should then be able to alter the current level of the selected option by pressing either the + or - buttons, to increase or decrease the current level. The change is indicated by a series of asterisks below the selected option:
![]()
The warning messages you are most likely to come across are:
![]() The monitor has gone into standby mode. The back light becomes dimmer in this mode.
The monitor has gone into standby mode. The back light becomes dimmer in this mode.
![]() There is no power signal, turn the system off.
There is no power signal, turn the system off.
![]() There is a power failure, turn the system off.
There is a power failure, turn the system off.
![]() There is a problem, turn the system off.
There is a problem, turn the system off.
If you ever come across any of the above warning messages, then it is advisable to turn the computer off, check that all power connection cords are securely and correctly in place and then switch the power back on.