Acer File Extensions |
Advent 3929 PC
| CPU | Intel Pentium III 1.0GHz |
| BIOS | Insyde Software BIOS. Press the F2 key to enter |
| Motherboard | SiS 630 KA |
| Memory | 128MB PC133 SDRAM (3 memory slots. Max 1.5GB) |
| Hard Drive | 40GB Seagate |
| CD Drive | 8x Toshiba SD-C2502 DVD-ROM |
| Floppy Drive | Floppy disk drive fitted |
| Monitor | 14.1" TFT (native resolution 1024 x 768) |
| Video Card | SiS 630 (16MB shared) |
| Sound Card | SiS 7018 integrated |
| Speakers | Built-in speakers |
| Modem | SmartLink LP200 MDC 56K V90 |
| Network Card | SiS 900 integrated fast ethernet |
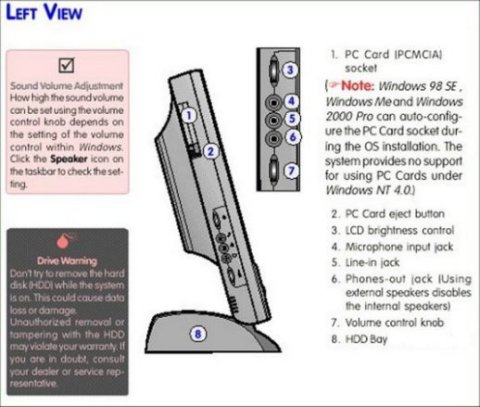
| Ports (left) | 1x PC Card slot 1x Microphone 1x Headphone 1x Line-in |
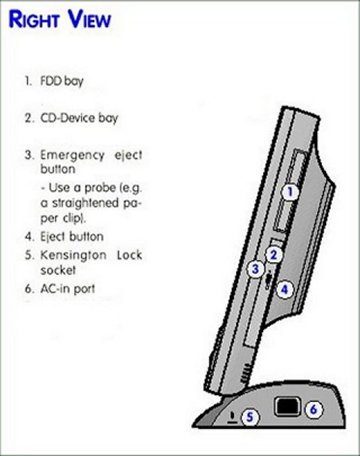
| Ports (right) | 1x Kensington Lock |
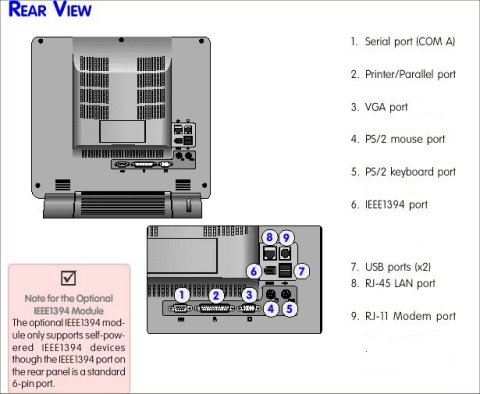
| Ports (rear) | 1x Serial 1x Parallel 1x VGA 1x PS/2 Keyboard 1x PS/2 Mouse 1x IEEE1394 (FireWire) 2x USB 1x LAN 1x Modem |
| Keyboard | BTC internet keyboard (PS/2) |
| Mouse | BTC EZBrowser optical mouse |
| Made By | Clevo LP200T |
Drivers
You can install individual drivers by using the recovery disc. Insert the CD and allow it to load. When the menu appears, click the appropriate button and follow the instructions to complete the installation.
Motherboard
- System Memory:
- Integrated PC133 SDRAM Controller
- 3 DIMMs up to 1.5GB of system memory
- Virtual Channel Memory (VCM) support
- Synchronous or Asynchronous Host/SDRAM Bus Frequency
- Core Logic (Chipset): SiS 630 integrated
- IO Controller: Dual Ultra 33/66 IDE controller
- Audio Chipset:
- Integrated 3D positional audio controller
- 64-voice polyphony wavetable synthesizer
- DirectSound 3D accelerator for IID, IAD and Doppler effects
- Full-duplex, independent sample rate converter for audio recording and playback
- Supports 2/4/6 speakers with external AC'97 codecs
- AC'97 V2.1 interface for external audio codec
- SoundBlaster Pro/16 compliant
- Driver support for Windows 95/98, Windows NT 4.0, Windows 2000.
- Video and graphics:
- Integrated 128-bit 2D/3D graphics accelerator
- Advanced hardware acceleration for DVD playback including MC, IDCT
- Ultra-AGPTM architecture
- Fully DirectX 6 compliant graphics engine
- UMA architecture with 2/4/8/16/32/64 system memory sharable as display memory
- Resolution up to 1920x1200 256/32K/64K/16M colour @80Hz NI
- Optional Extended Graphics Memory (EGM) on-board for 128-bit memory accessing
- Supports VESA DDC1, DDC2B & DDC 3.0
- Driver support for OS/2, Windows 95/98,Windows NT 4.0, Windows 2000
- Support SiS301 Video Bridge Interface for dual display
- NTSC/PAL TV or secondary CRT monitor or TFT digital LCD monitor
- Compliance: ACPI 1.0, APM 1.2 Compliant
- Rear Connectors:
- 1x Serial
- 1x Parallel
- 1x VGA
- 1x PS/2 mouse
- 1x PS/2 Keyboard
- 1x IEEE1394 port (note - self powered devices only)
- 2x USB ports
- 1x RJ-45 network
- 1x RJ-11 modem
Case Layout
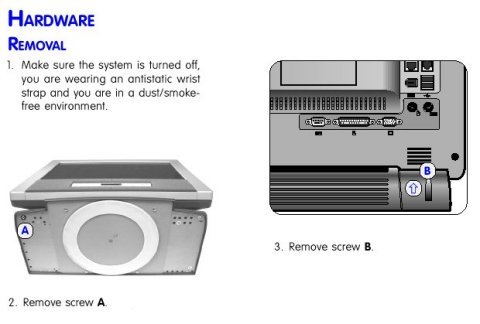
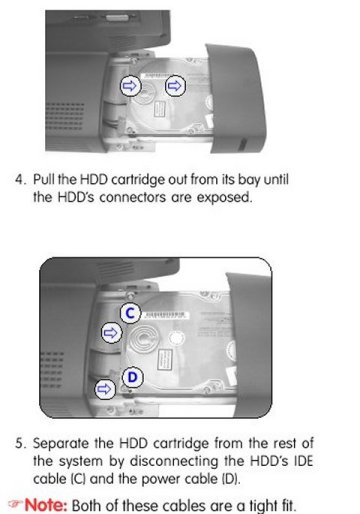
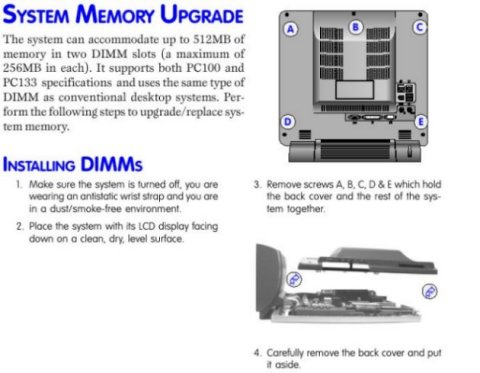
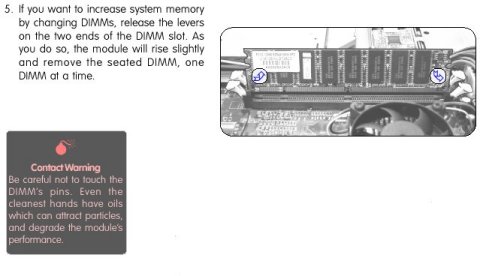
Case Removal / System Upgrades
In the Box
Disks Supplied
- Advent recovery CD ME1
- Advent recovery supplementary CD for 3929
- Microsoft Works Suite pack (complete with Certificate of Authenticity)
- Intervideo WinDVD 2000
- KeyMaestro keyboard driver floppy disk
- EzBrowse mouse driver floppy disk
- Advent 3000 bonus pack
Items Supplied
- Advent 3929 base unit - all in one design with LCD and speakers built in
- BTC Millennium keyboard (PS/2)
- EZBrowse optical mouse (PS/2)
- UK mains power cable
- UK modem cable
Documentation Supplied
- Advent setup top sheet
- Advent 3000 user manual
- "Getting started with Microsoft Windows Me"
- Concise users manual
- Supplement to personal computer setup guide leaflet
Recovery Disc
Information on the Advent ME1 recovery process.
Insert the ME1 recovery CD into your CD or DVD drive. Restart the computer and wait for the follwoing menu to load:
- Restore Windows system files. This will restore Windows system files only, the user's files will not be affected.
- Recover current Windows. This will reinstall Windows files only, again users files and installed applications will not be affected.
- Quick Restore System- No format. This will reinstall your operating system while keeping the users data intact however any Windows applications and settings will require reinstalling. The original copy of Windows will be backed up to directory on the HDD.
- Quick Restore System- Quick Format. This will format the Hard drive and reinstall the operating system. All of the user's data will be lost.
To run a full recovery select "Quick Restore System - Quick Format". Please note that all your data will be lost. The recovery will now begin. Once the first CD is loaded you will be asked to insert your Supplement CD. At the end of the process remove the Supplement CD and allow the computer the restart.
If the mouse does not work...
Occasionally when attempting to recover an Advent PC with ME1 and Supplementary CD the mouse pointer does not appear on the options screen. It is currently unknown what causes this, however, it is still possible to recover the system using the keyboard shortcuts as shown below:
- Press the TAB key twice.
- At this point you should notice a dashed highlight over the Restore Windows system files option and a black dot in the radio button next to it.
- Using the up and down arrow keys select the required option. For complete recovery of the PC press the down arrow three times to highlight the last option Quick Restore System- Quick Format.
- Press TAB once to highlight Next then press Enter. This will start the recovery process.
- To exit from the restore procedure while still in this menu press TAB once to highlight Exit. (This assumes you are pressing TAB while Next is highlighted).
Driver installation
You can install individual drivers from the ME1 CD. Insert the CD and allow it to load. When the menu appears, click the appropriate button and follow the instructions to complete the installation.