 Acer File Extensions |
Advent 7047 Laptop
Specification
| CPU | Mobile Intel Pentium 4 3.20GHz |
| BIOS | PhoenixBIOS. Press the F2 key to enter |
| Chipset | Intel 865PE |
| Memory | 512MB PC2700 DDR SODIMM (2 memory slots. Max 2GB) |
| Hard Drive | 60GB Hitachi Travelstar IC25N060ATMR04-0 |
| CD Drive | QSI SDW-041 DVD+RW |
| Screen | 15" TFT (Native Res.1024x768) |
| Video Card | nVIDIA GeForce FX Go 5300 (128MB) |
| Sound Card | Realtek AC'97 audio |
| Modem | Intel 537EAG (Creatix CTX604_V1) |
| Network Card | Realtek 8139 / 810X (onboard) Prism 3890 802.11g wireless (Medion/Z-Com XG-601MB) |
| PC Card | Will take either 2x Type I/II or 1x Type III |
| Ports | 2x PC Card Slot 1x 3-in-1 Card Reader (supports SD, MMC, and Memory Stick cards) 1x IEEE1394 (FireWire) 1x IR 1x Kensington Lock 1x Parallel 1x S-Video (TV-Out) 1x VGA 4x USB 2.0 1x Modem 1x LAN 1x Headphone (inc S/P-DIF) 1x Microphone |
| Battery | BTP-67EM (14.8v 6000mAh) |
| Dimensions | 44 x 325 x 288 (HxWxD in mm) |
| Weight | 3.5kg |
| Made By | Medion WID2000 (either MD40673 or MD41271) |
Drivers
Your laptop should have a backup copy of all the drivers, you can find it by browsing to the c:\applications\drivers folder.
Memory Upgrades
This laptop has two memory slots which are accessed by removing the memory compartment cover underneath the laptop (see Laptop Layout section below).
Laptop Layout
Open Case
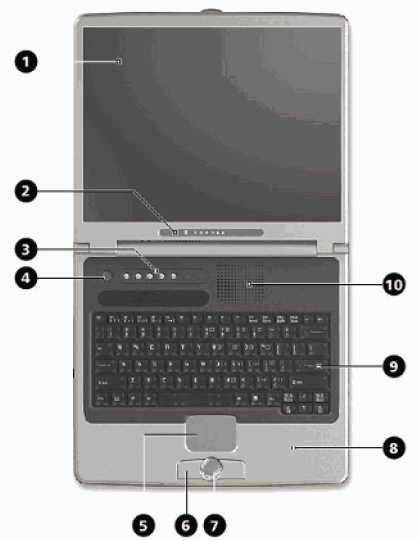
- TFT Display
- Status Operation Indicators (see below)
- Hotkeys (see below)
- Power ON/OFF
- Touchpad
- Touchpad Keys
- Palm Rest
- Keyboard
- Fan Slot
Status Operation Indicators
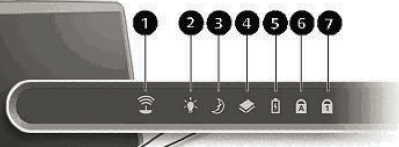
- Wireless LAN activity
- Power/Battery
- Stand-by mode
- Hard disk activity
- Battery charging
- Caps Lock
- Num Lock
Hotkeys
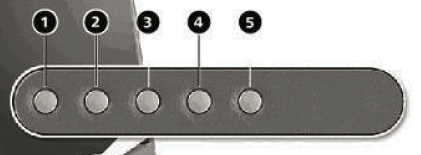
- Launches the email program
- Launches the internet browser
- Enable/disable the tv-out option
- Switches between different screen resolutions (640x480, 800x600, 1024x768)
- Enable/Disable the wireless LAN
Left Side
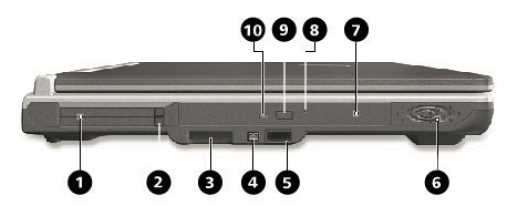
- PC card Slot (PCMCIA)
- PC card eject button
- 3 in 1 card interface
- IEEE1394 (4-pin)
- Infrared Port
- Stereo Speaker
- Optical Drive
- Disc emergency eject
- Disc eject button
- Activity LED optical drive
Right Side
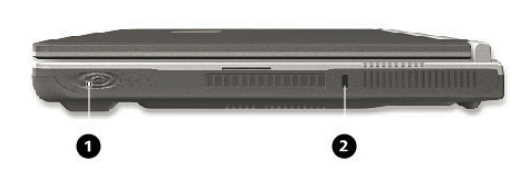
- Stereo Speaker
- Kensington lock
Rear View
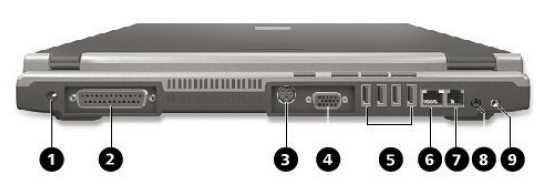
- Power Socket
- Parallel Port
- TV/Video Out (S-Video)
- External Monitor (VGA)
- USB ports
- LAN port (RJ-45)
- Modem port (RJ-11)
- Line out/SPDIF (optical out)
- Line in/Microphone in
Bottom View
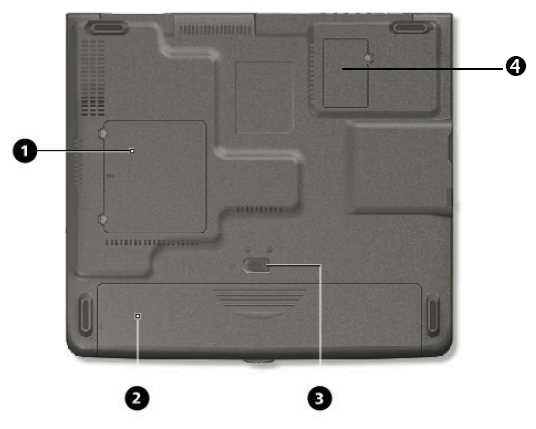
- Memory compartment
- Battery bay
- Battery lock/unlock latch
- Modem cover
Note that the hard disk drive can be removed only when the battery has been released.
Replacing the DVD Drive
Many thanks to David Morrison for taking the time to send this in -
Replacing the DVD writer is a very easy job only a small cross-head screwdriver and a new DVD writer are needed. Most laptop slimline DVD writers will work - I fitted a Sony NEC Optiarc AD7543A which can read and write more formats than the original, including burning Labelflash labels.
- Remove one screw from the middle of the base (red arrow) and slide out the old DVD writer (green arrow). If the DVD writer is not responding, it helps to open the drawer by pushing a paperclip into the hole beside the button on the drawer.
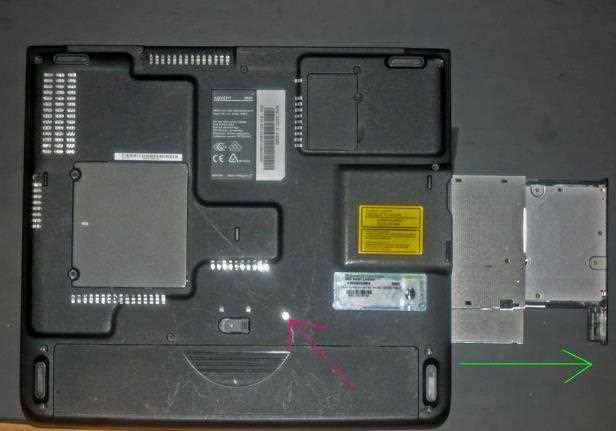
- Undo 2 screws (red arrows) to remove the fixing bracket on the old DVD writer.
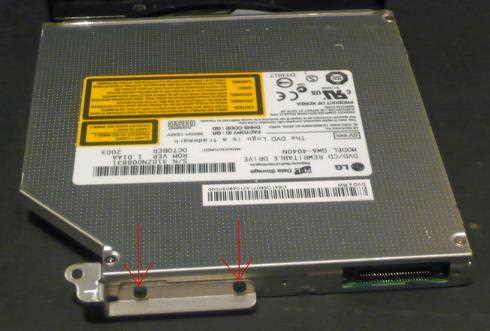
- Attach the fixing bracket to the new DVD writer by screwing it into the holes marked with the red arrows.
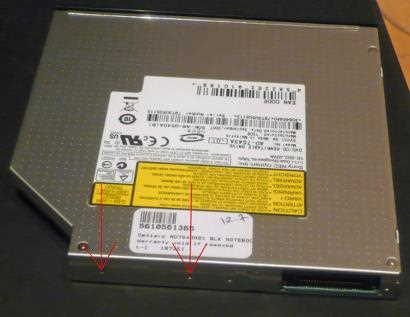
- Slide the new unit into the laptop and replace the screw in the base of the unit. When the laptop boots-up it will detect the new DVD writer.
Function Keys
Fn + F1 - A list of the combinations is displayed
Fn + F2 - Power saving functions (set to power down by default)
Fn + F3 - Toggles the display screen between LCD, CRT, and LCD+CRT
Fn + F4 - Switches the backlight off to save power (press any key to switch on again)
Fn + F5 - Speaker on/off
Fn + F11 - Num lock
Fn + F12 - Scroll lock
Fn + right arrow - Brightness up
Fn + left arrow - Brightness down
Fn + up arrow - Volume up
Fn + down arrow - Volume down
Fn + PgUp - Home. The cursor on the screen will skip to the start of the line.
Fn + PgDn - End. The cursor on the screen will skip to the end of the line.
In the Box
Disks Supplied
- Advent system recovery CD version 3
- Microsoft Works 7 CD (Product key on CD sleeve)
Items Supplied
- Advent 7047 notebook
- Mains power adapter
- Mains power cable
- UK modem cable
- BT phone connector
Documentation Supplied
- Setup topsheet
- Advent user manual
- Advent troubleshooting guide and support information
- Microsoft Windows XP Home Edition "Start here" guide
- Cyberlink PowerDVD solution product key card
Recovery Disc
Due to the nature of the recovery process you should not use FDISK or any other partition management software to delete the partition on your Advent computer. Doing so will prevent the recovery from functioning correctly. If the recovery asks for a second CD you will need to obtain an Update CD from Advent.
To recover your Advent PC you will need your Advent System Recovery CD.
- Place the CD into the DVD drive and restart your computer.
- Press R on the keyboard when prompted.
- The recovery will load and display a menu of options:
- Non-destructive recovery: This option will restore Windows, supplied applications, and drivers. This option will not destroy your documents or programs. These will be backed up along with the registry. These are restored at the end of the recovery process.
- System Recovery - No format: This will reinstall Windows, supplied applications and drivers. It will move your files to a folder called "My old disk structure". Any applications (except those supplied) will need to be reinstalled.
- System Recovery - Quick format: This option will erase your hard drive including your personal files. Windows, supplied applications and drivers will be reinstalled.
- Select the Non-destructive recovery option and press Next.
- You will be informed about System Restore in Windows, click Yes.
- The recovery will begin. Once this is complete you should eject the CD and click Restart.
Additional information.
Press the ALT and D keys at the recovery menu to access a command prompt. This will allow access to C: drive. The command prompt will default to E:\i386\system32 where you can run a variety of tools including CHKDSK.EXE.
Reinstalling applications
From version 2.x of the recovery system onwards you can install applications from the c:\applications folder. Drivers can be installed from the c:\applications\drivers folder and utilities from the c:\applications\tools folder. You will still need to install Microsoft Works from the supplied CD.