Acer File Extensions |
Advent 7041 Laptop
Specification
| CPU | Intel Centrino Mobile 1.5GHz |
| BIOS | Insyde BIOS. Press F2 to enter |
| Memory | 512MB PC2700 DDR SODIMM (2 memory slots. Max 2GB) |
| Hard Drive | 40GB Seagate ST94011A |
| CD Drive | QSI SBW-242 DVD-ROM/CD-RW |
| Screen | 15.2" widescreen TFT (native resolution 1280x854) |
| Video Card | nVIDIA GeForce FX Go 5200 64MB |
| Sound Card | Realtek AC'97 audio |
| Modem | HSP 56-MR-8060B |
| Network Card | Realtek 8139 / 810X (onboard) Intel Pro 2100 wireless LAN |
| PC Card | 1x Type I/II |
| Ports | 1x Microphone 1x Line-in 1x Headphone 1x PC card slot 1x Infrared 3x USB 2.0 (Some early models may only have 2 ports) 1x IEEE1394 (FireWire) 1x LAN 1x Parallel 1x VGA 1x S-Video (TV-Out) 1x Modem 1x Kensington Lock |
| Battery | 11.1v 6000mAh |
| Dimensions | 34 x 345 x 262 (HxWxD in mm) |
| Weight | 2.7kg |
| Made By | Medion MIM2000 (MD40676) |
Drivers
Your laptop should have a backup copy of all the drivers, you can find it by browsing to the c:\applications\drivers folder.
Memory Upgrades
This laptop has two memory slots, one can be accessed by removing the memory compartment cover (see Bottom of Laptop section below) and the other is hidden away under the keyboard. The keyboard is held in by 3 retractable clips (top left, top middle, top right) which can be released with a small screwdriver. Then lift the keyboard clear of the laptop, there is a ribbon cable attached to the keyboard so take care. If the memory slot isn't visible then it may be hidden under some black tape which needs to be carefully peeled back first.
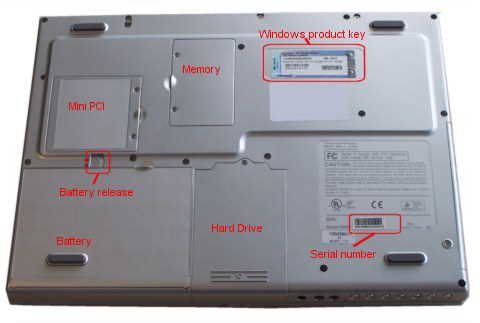
Bottom of Laptop
Function Keys
Fn + F1 - Switches the wireless LAN on/off
Fn + F5 - Toggles the external monitor output on/off
Fn + F6 - Decreases brightness
Fn + F7 - Increases brightness
Fn + F10 - Turns the low battery warning on/off
Fn + F11 - Switches the backlight of the display on/off
Fn + F12 - Power saving functions. Set to power down by default
Fn + Ins - Num lock
Fn + Del - Scroll lock
In the Box
Disks Supplied
- Advent system recovery CD version 2.1
- Microsoft Worksuite 2003 DVD (Product key on CD sleeve)
Items Supplied
- Advent 7041 notebook
- Mains power adapter
- Mains power cable
- UK modem cable
- BT phone connector
Documentation Supplied
- Advent user manual
- Advent troubleshooting guide
- Microsoft Windows XP Home Edition "Start here" guide
- PowerDVD XP 5 CD Key card
Recovery Disc
Due to the nature of the recovery process you should not use FDISK or any other partition management software to delete the partition on your Advent computer. Doing so will prevent the recovery from functioning correctly. If the recovery asks for a second CD you will need to obtain an Update CD from Advent.
To recover your Advent PC you will need your Advent System Recovery CD.
- Place the CD into the DVD drive and restart your computer.
- Press R on the keyboard when prompted.
- The recovery will load and display a menu of options:
- Non-destructive recovery: This option will restore Windows, supplied applications, and drivers. This option will not destroy your documents or programs. These will be backed up along with the registry. These are restored at the end of the recovery process.
- System Recovery - No format: This will reinstall Windows, supplied applications and drivers. It will move your files to a folder called "My old disk structure". Any applications (except those supplied) will need to be reinstalled.
- System Recovery - Quick format: This option will erase your hard drive including your personal files. Windows, supplied applications and drivers will be reinstalled.
- Select the Non-destructive recovery option and press Next.
- You will be informed about System Restore in Windows, click Yes.
- The recovery will begin. Once this is complete you should eject the CD and click Restart.
Additional information.
Press the ALT and D keys at the recovery menu to access a command prompt. This will allow access to C: drive. The command prompt will default to E:\i386\system32 where you can run a variety of tools including CHKDSK.EXE.
Reinstalling applications
From version 2.x of the recovery system onwards you can install applications from the c:\applications folder. Drivers can be installed from the c:\applications\drivers folder and utilities from the c:\applications\tools folder. You will still need to install Microsoft Works from the supplied CD.
FAQ
Realtek 8139 Network Card Not Connecting
Some machines fitted with a network card based on the Realtek 8139 chip will fail to send and receive data correctly. This can happen if the autodetect feature of the card is not detecting the connection properly. To get round this the connection speed of the card must be set manually
- Right-click upon the My Computer icon and select Properties.
- Select the Hardware tab and click on the Device Manager button.
- Click on the + next to Network Adapters.
- Select the entry for Realtek 8139 from the list and double click upon it.
- Select the Advanced tab.
- Select the entry for Link Speed / Duplex Mode.
- Change the Value setting from Auto to one that is appropriate for the connection (often 100 Full for a connection directly to another PC and 10 Full for a broadband connection).