Acer File Extensions |
Advent 7001 Laptop
Specification
| CPU | Intel Pentium 4 1.6Ghz |
| BIOS | AMI BIOS. Press DEL to enter |
| Chipset | VIA PROSavageDDR |
| Memory | 512MB PC2100/2700 DDR SODIMM (2 memory slots. Max 2GB) |
| Hard Drive | 20GB |
| CD Drive | 8 x QSI SDR-081 DVD ROM |
| Floppy Drive | Floppy disk drive fitted |
| Screen | 14.1" TFT (Native Res.1024x768) |
| Video Card | S3 ProSavage 32MB DDR (32MB shared) |
| Sound Card | VIA AC97 PCI audio (WDM) |
| Modem | SmartLink 56K |
| Network Card | VIA Fast Ethernet Adapter (10/100 Mbps) |
| PC Card | 1x Type I/II |
| Ports | 1x Microphone 1x Headphone 3x USB 1x Smartcard slot 1x IR 1x PC Card slot 1x Modem 1x LAN 1x S/PDIF 1x Kensington Lock 1x VGA 1x IEEE1394 (FireWire) 1x Audio out 1x S-Video (TV-Out) |
| Battery | UN355V1-S1 (11.1v 8000mAh) |
| Dimensions | 41 x 325 x 275 (HxWxD in mm) |
| Colour | Silver |
| Weight | 3.2kg |
| Made By | Gericom Webgine Series N355V1 |
Drivers
Your laptop should have been supplied with a "Utility and Driver CD" which contains a backup copy of all the drivers.
Memory Upgrades
Access to the memory slots is by removing the keyboard. To upgrade the memory do the following -
- Power OFF the notebook. Unplug the AC cord and all cables/devices attached to the notebook.
- Place your hand on a large metal object momentarily to discharge any static electricity.
- Place the notebook on a flat surface and fully open the LCD lid.
- Find the keyboard latches A, B and C near the top edge of the keyboard. The latch is spring-loaded. It will retract when pressed and revert back to its original position when released.
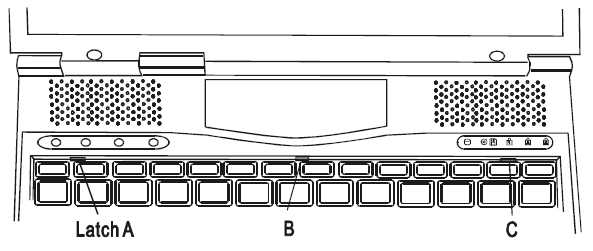
- Use a small blade to press the latch A inward. The keyboard tray should pop up slightly over the latch. If the keyboard tray does not pop up, try to gently lift it up just over the latch. Repeat the step for the other keyboard latches.
- Carefully lift up the bottom edge of the keyboard and the DIMM socket it revealed.
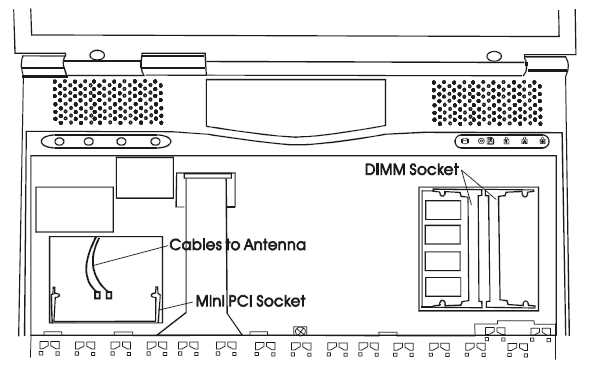
- If you want to remove an old DIMM from the socket, press out on the latches located on both edges of the socket at the same time. The DIMM should pop up to an angle of 30 degree, simply pull the DIMM module out of the memory socket.
- To install the new DIMM module into the memory socket, the DIMM will only fit in one way. Insert the DIMM at an angle of approximately 30 degrees into the empty memory socket. Then press it firmly so that the contact edge is driven into the receiving socket.
- Pivot the DIMM until the latches on both sides of the socket snap into place. At the time, you will hear a click.
- Put the keyboard back to its original face-up position. Make sure the top edge of the keyboard now resides under the spring-loaded latches.
Bottom of Laptop
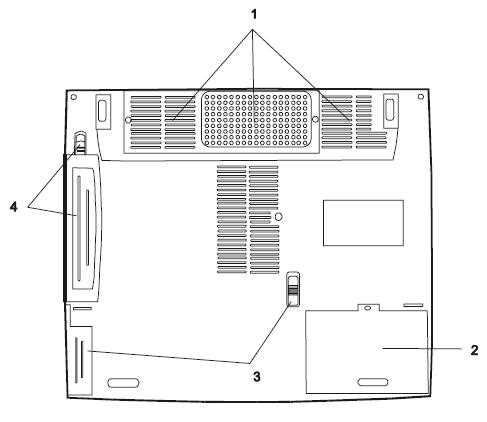
1. Ventilation grills
2. Hard disk drive bay
3. Battery pack and latch
4. Swappable device bay
Function Keys
Fn + F1 - Sleep Mode
Fn + F3 - Turns Battery Warning Beep on or off
Fn + F4 - Toggle the display between LCD, CRT, and LCD+CRT
Fn + F5 - Increase volume
Fn + F6 - Decrease volume
Fn + F7 - Increase brightness
Fn + F8 - Decrease brightness
Fn + Num Lock - Enables Numeric Keypad
In the Box
Disks Supplied
- Advent recovery CD
- Notebook utilities CD version 0.9
- PowerDVD XP 4.0 (serial number on CD sleeve)
Items Supplied
- Advent 7001 laptop
- Mains power adapter
- Mains power cable
- UK modem cable
- BT connector
Documentation Supplied
- Advent user manual
- Advent installation and troubleshooting guide
- Microsoft Windows XP "Start here" guide
Recovery
Warning: this process will erase all files from your computer. It is important that you save any personal files to disk before you begin.
A bootable recovery CD is supplied with these machines.
To recover the system:-
- Insert CD (and floppy disk if supplied) into the drive.
- Reboot the PC.
- A warning message prompting you to backup data before proceeding.
- Press Y to continue.
- A final warning that all data will be erased is displayed.
- Press Y to continue.
- Finally a message "Remove CD-ROM when prompted" is displayed.
- Press Y to continue.
- The image file will load. Once complete you will be prompted to remove the CD and press CTRL + ALT + DEL to restart.
Driver CD
The notebook is supplied with a Utility CD. This can be used to restore corrupt drivers. The folders on the CD contain the following -
- Driver: Drivers for all the hardware.
- Manual: This folder contains individual PDF files for each chapter
- Utility: Flash BIOS Utilities, HDPrepare, QKey