Acer File Extensions |
Advent 6415 Combo Laptop
Specification
| CPU | Intel Pentium III 1.2GHz |
| BIOS | AMIBIOS. Press DEL to enter |
| Chipset | SIS 630 |
| Memory | 512MB PC133 SDRAM SODIMM (2 memory slots. Max 512MB) |
| Hard Drive | 30GB |
| CD Drive | 4x 4x 6x 24x Toshiba SD-2002 DVD/CD-RW combination drive |
| Floppy Drive | Floppy disk drive fitted |
| Screen | 14.1" TFT (Native Res.1024x768) |
| Video Card | SiS 630 (up to 32MB shared) |
| Sound Card | SiS 7018 |
| Modem | SmartLink 56K - HAMR 5600 V.90 |
| Network Card | SiS 900 |
| PC Card | Will take either 2x Type I/II or 1x Type III |
| Ports | 1x IR 1x Kensington Lock 1x USB 1.1 1x Modem 1x PS/2 1x Microphone 1x Headphone 1x S-Video (TV-Out) 1x VGA 1x Serial 1x Parallel 1x LAN |
| Dimensions | 39.5 x 315 x 256 (HxWxD in mm) |
| Weight | 3kg |
| Made By | Gericom N340S8 |
Drivers
Your laptop should have been supplied with a utility CD which contains a backup copy of all the drivers.
Memory Upgrades
- Remove the keyboard by releasing the 3 retractable clips at the front of the keyboard with a small screwdriver (clips are below the 'Fn', 'Alt Gr', and 'Down Arrow' keys).
- Lift the keyboard clear of the notebook, there is a ribbon cable attached to the keyboard so take care.
- Now lift the metal keyboard protector from the case.
- Next remove the metal cover in the middle of the case (held in by two screws).
- You now have access to the 2 memory slots.
Bottom of Laptop
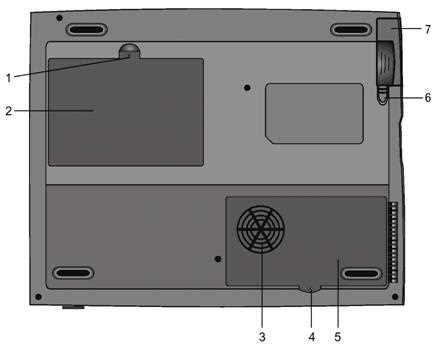
1. Fixing screw
2. Hard drive bay
3. CPU heatsink / fan grill
4. Fixing screw
5. CPU heatsink cover
6. Battery latches
7. Battery pack
Function Keys
FN + F1 - Hibernate
FN + F3 - Battery Low Warning Beep on/off
FN + F4 - Toggle the display between LCD, CRT, LCD+CRT
FN + F5 - Increase volume
FN + F6 - Decrease volume
FN + F7 - Increase brightness
FN + F8 - Decrease brightness
FN + Num Lock - Activate Numeric Keypad
Note - The Fn + F9/F10 contrast control keys don't work on the 6415 Combo as it has a TFT display. These keys are only designed to work on older models using Dual Scan DSTN screens.
In the Box
Disks Supplied
- Advent recovery CD
- Driver utility CD ver. 1.0
- PowerDVD (serial number on the sleeve)
Items Supplied
- Advent 6415 Combo notebook
- Mains power adapter
- Mains power cable
- UK modem cable
Documentation Supplied
- Advent notebook user's manual
- Microsoft Windows XP "Start here" guide
- Freeserve leaflet
Recovery
Warning: this process will erase all files from your hard drive. It is important that you save your files before you begin.
Your Advent notebook is supplied with a bootable recovery CD. To begin insert the CD and restart the notebook. During boot you will see the message:
"Press "R" to begin the recovery process"
The recovery process will load and present you with the welcome screen. You have 2 options:
- Non Destructive Recovery - this will not erase and user files, applications or settings. Press Next to begin.
- Advanced Options - this gives the options for System Recovery - Quick Format which will erase all data and, System Recovery - No Format which will remove user installed applications and settings, it will save your files to C:\Backup. Select which of the options you wish to use and click Next.
Driver CD
The notebook is supplied with a Utility CD. This can be used to restore corrupt drivers.
FAQ
Laptop runs through OOBE twice after recovery
After running the recovery discs the laptop goes through the Out Of Box Experience (OOBE) twice. This is a random occurrence and the only solution is to let the OOBE run twice as it will not cause any problems to the operation of the laptop.
Replacing the CMOS Battery
To get to the CMOS battery you need to remove the CPU heatsink cover underneath the laptop. The battery is a coin sized CR2025. If you have problems reaching the battery then you'll need to take out the CPU heatsink, to do this remove the 4 screws holding it in and lift out carefully.
Repairing a Broken Charger Socket
Kyle Millican has put together a guide for repairing a broken charger socket on this laptop. The guide is in PDF format and can be downloaded from here - Kyle Millican’s - Advent Laptop Charger Socket Repair Guide (2MB)