Acer File Extensions |
Acer 6300 Motherboard
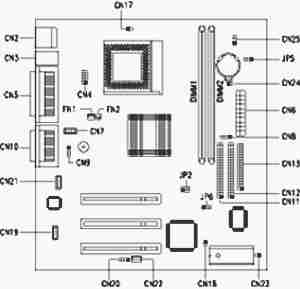
Jumper and Connector Layout
Jumper Settings
| Jumper | Setting | Function |
|---|---|---|
| JP2 - CPU/DRAM Frequency | 1-2, 4-5 2-3, 5-6 | 100/100 MHz 66/100 MHz (default) |
| JP6 - Password Check | 1-2 2-3 | Check password Bypass password (default) |
Connector Functions
| Connector | Function |
|---|---|
| CN2 | USB |
| CN3 | Upper port: mouse; Lower port: keyboard |
| CN4 | COM 1 |
| CN5 | Upper: parallel/printer; Lower left: COM2; Lower right: VGA |
| CN6 | ATX power |
| CN7 | Speaker |
| CN8 | Hard disk drive (HDD) LED |
| CN9 | PC speaker |
| CN10 | Upper: game/MIDI; Lower left: line-out Lower center: line-in; Lower right mic-in |
| CN11 | IDE 2 |
| CN12 | IDE 1 |
| CN13 | Floppy disk drive (FDD) |
| CN17 | CPU temperature sensor |
| CN18 | Intrusion alarm |
| CN19 | Voice modem |
| CN20 | Modem ring-in |
| CN21 | CD-in |
| CN22 | Wake-on LAN (WOL) |
| CN23 | Power button |
| CN24 | Reset button |
| CN25 | Turbo LED |
| DIMM 1 DIMM 2 | Memory module sockets |
| FN1 | 3-pin CPU fan |
| FN2 | 2-pin CPU fan |
| JP5 | Power LED |
Memory Upgrade
The computer has two DIMM sockets. Memory is upgradeable to a maximum of 256 MB, employing 8-/16-/32-/64-/128-MB DIMMs.
Note - DIMMs in both slots should be of the same type. Do not mix different DIMM types, EDO and SDRAM, together.
BIOS
How do I enter the BIOS Setup Utility?
You can access the BIOS Setup Utility by pressing CTRL+ALT+ESC as the system is booting. At the bottom of the second start up screen you should see "To enter setup, press CTRL_ALT_ESC".
Note: If the system displays the Acer Splash Screen, once you hear the beep, you should begin pressing CTRL+ALT+ESC. You may need to press CTRL+ALT+ESC continuously until you access the BIOS setup screen.