Acer File Extensions |
Acer AcerNote 370P
Overview
Here are just a few of the notebook's many features:
- Performance
- High-end Pentium microprocessor
- Support 64-bit main memory and external (L2) cache memory
- Large LCD display (DualScan STN and TFT active matrix.)
- PCI local bus video with graphics acceleration and 1MB video RAM boost video performance
- Internal 3.5-inch floppy drive or CD-ROM drive
- High-capacity, Enhanced-IDE hard disk
- Lithium-Ion or Nickel Metal-Hydride battery pack
- Power management system with standby and hibernation power saving modes
- Multimedia
- 16-bit stereo audio with software wavetable
- Built-in dual speakers
- Ultra-slim, high-speed CD-ROM drive
- Human-centric Design and Ergonomics
- Lightweight and slim
- Sleek, smooth and stylish design
- Full-sized keyboard
- Wide and curved palm rest
- Centrally-located touchpad pointing device
- Expansion
- PC card (formerly PCMCIA) slots (two type II/I or one type III) with ZV (Zoomed Video) port support
- Upgradeable memory, hard disk, CPU
Upgrade Memory
Memory is upgradeable from 8 to 64 MB, using 8/16/32 MB 64-bit soDIMMs (Small Outline Dual Inline Memory Modules). After installing the memory modules, the system automatically detects and reconfigures the total memory size during the POST routines. The following lists important memory specifications.
- Memory bus width: 64-bit
- Expansion RAM module type: 144-pin, 64-bit, small outline Dual Inline Memory Module (soDIMM)
- Expansion RAM module size/configuration:
- 8MB (1M*16x4)
- 16MB (2M* 8x8)
- 32MB (4M*16x4)
- Expansion RAM module speed/voltage/package: 60ns/3.3v/TSOP EDO
Fitting the Memory
1. Turn off your notebook and disconnect it from the AC power adapter.
2. At the bottom of the notebook, you will find a large door on the lower right-hand corner closed by a single screw. Remove the screw and door.
3. You will see two white sockets, one on top of the other, used to hold the memory modules in place. Gently push the memory module into an open socket until it is firmly seated between the clips . It can only be placed in one direction.
4. If you need to remove an existing module to make room for a new one, locate the small metal tabs found on either side near the top of the installed module. Gently push the tabs in a direction away from the center of the module. Once the module springs loose, carefully remove the module and follow step 3 to install a new module.
5. Replace the door and secure it with the screw.
Disabling the Password
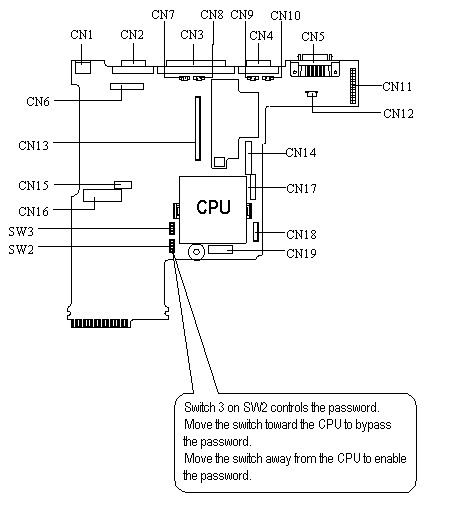
Follow the steps below to disable the password.
1. Lift up the keyboard and remove the heatshield.
2. Locate switchblock SW2 which is to the left of the CPU and below SW3.
3. Move switch #3 on switchblock SW2 toward the CPU to disable the password checking feature.
Known Issues
Unable to Create Utility Disk 6 on 370P
When creating the 370P Utility Disk set, the user reaches disk 6 (PCMCIA Drivers for DOS/Win3.1x Disk 2). After inserting the labelled disk and a brief 'format' stage, the message "Unable to Transfer Files to Disk" error message appears.
The user can skip this disk and complete the utility disk set. The skipped disk will be blank.
This happens with earlier versions of preload version UK.00052.000. The preload version can be seen just under 'Acer Computer B.V.' on the 'General' tab of 'System Properties'. (Right click 'My Computer' and select 'Properties'.) There is an error in the file C:\WINDOWS\OPTIONS\MSCSD11.INI which controls the creation of the utility disk set. In the [DISK6] section, file2 is incorrectly named; there is a spurious underscore at the end of the name.
The preload has been corrected. The user can skip Disk 6 as above, putting the diskette to one side. When the last disk has been completed, Disk 6 can be made manually by copying the two files in directory C:\ORIGINAL\370PV101\DISK6\ to the diskette.
Suspend Function under Windows 95 and AcerNote 370P
A default Windows '95 installation on a system with a CD-ROM drive will enable the operating system function that automatically checks for the insertion of a new CD into the drive.
On the AcerNote 370P, if you have selected Windows '95 as your operating system from the Acer Dual Load preload, this regular check for a new CD will prevent the notebook's Suspend function activating. To enable the Suspend function, you can stop the regular CD check by following the instructions below.
- Exit all applications.
- Click on the Start button and select Settings followed by Control Panel.
- From the Control Panel select System.
- From System select Device Manager.
- Double click on CD-ROM.
- Double click on Matsushita.
- Select Settings.
- Click on the auto insert notification option to Disable this function.
- Click OK to save these settings.
- Select Yes when asked to reboot your system. The changes you have made will not take affect until you reboot your system.
370/370P and X-Jack PCMCIA Cards
The stylish curves of the AcerNote 370 and 370P have one small disadvantage. Some modem PC Cards (formerly called PCMCIA Cards) use a phone cable connector called an 'X-Jack'. The connector 'pops out' from the end of the card and a standard phone cord (RJ11) fits into it from the top.
You can only put this type of card into the lower slot. The PC Card slots are slightly recessed into the body of the 370 case and there is not enough clearance to fit a card into the top slot and insert the connector. If you need to fit another card, it must be in the top slot and its connections must be small and in the centre or right of the card, avoiding the X-Jack connector.
Remember that Zoomed Video is only supported in the lower slot so you cannot use an X-Jack card at the same time as a ZV Card as they both need to be in the same slot.